web-vision Mage UniTY for Magento 2
The Mage UniTY extension, developed by web-vision, allows seamless integration of the TYPO3 content management system with an existing Magento shop. This integration enhances search service optimization, improves visitor experience, and facilitates professional content marketing for your Magento store.
Installation in your Magento Online Shop
Note : in production please use the
--keep-generatedoption
Step 1 : Setup TYPO3 and install UniTY for typo3
Step 2 : Setup Mage UniTY for Magento.
Step 2.1 : Mage UniTY Setup Guide
Follow these simple steps to set up Mage UniTY via composer or manual installation.
Step 2.1.1 : Installation via Composer:
Open your Magento 2 root folder in your terminal.
Run the following command to install the Mage UniTY module:
composer require extendware/unity
Apply database updates by running php bin/magento setup:upgrade
Flush the cache by running php bin/magento cache:flush
Step 2.1.2 : Manual Installation:
Unzip the zip file in app/code/WebVision/Unity
Enable the module by running php bin/magento module:enable WebVision_Unity
Apply database updates by running php bin/magento setup:upgrade
Flush the cache by running php bin/magento cache:flush
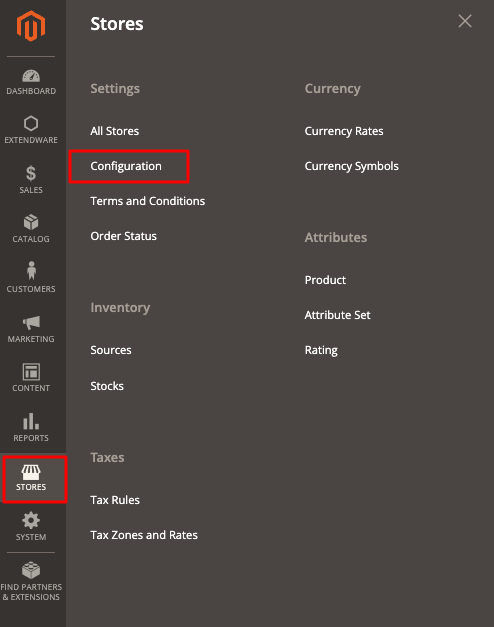
Step 2.2 : USER GUIDE
Step 2.2.1 : CONFIGURATION
You will find all settings in Admin > Stores > Settings > Configuration > web-vision > web-vision UniTy.
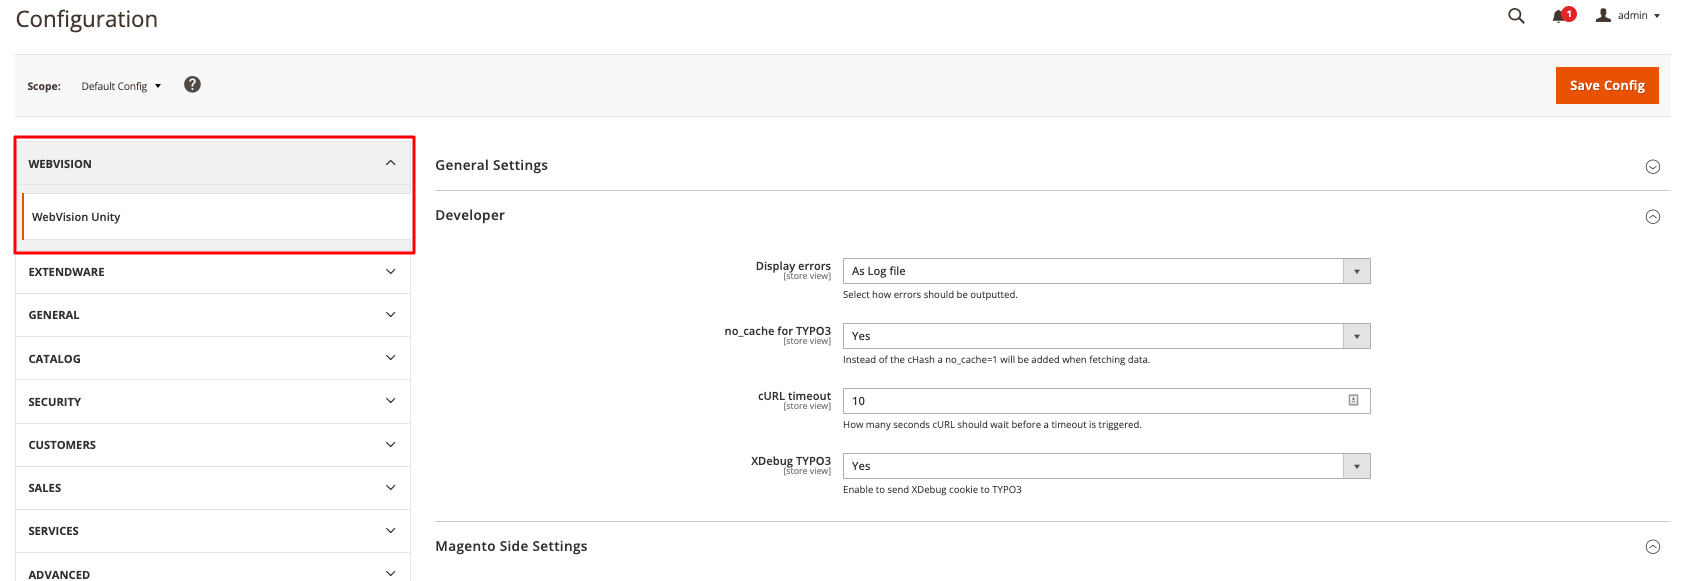
Here Magento configuration is divided into 5 Setps:
General Settings
Developer
Magento side settings
TYPO3 side settings
Mode specific settings
Setp 1. - General Settings
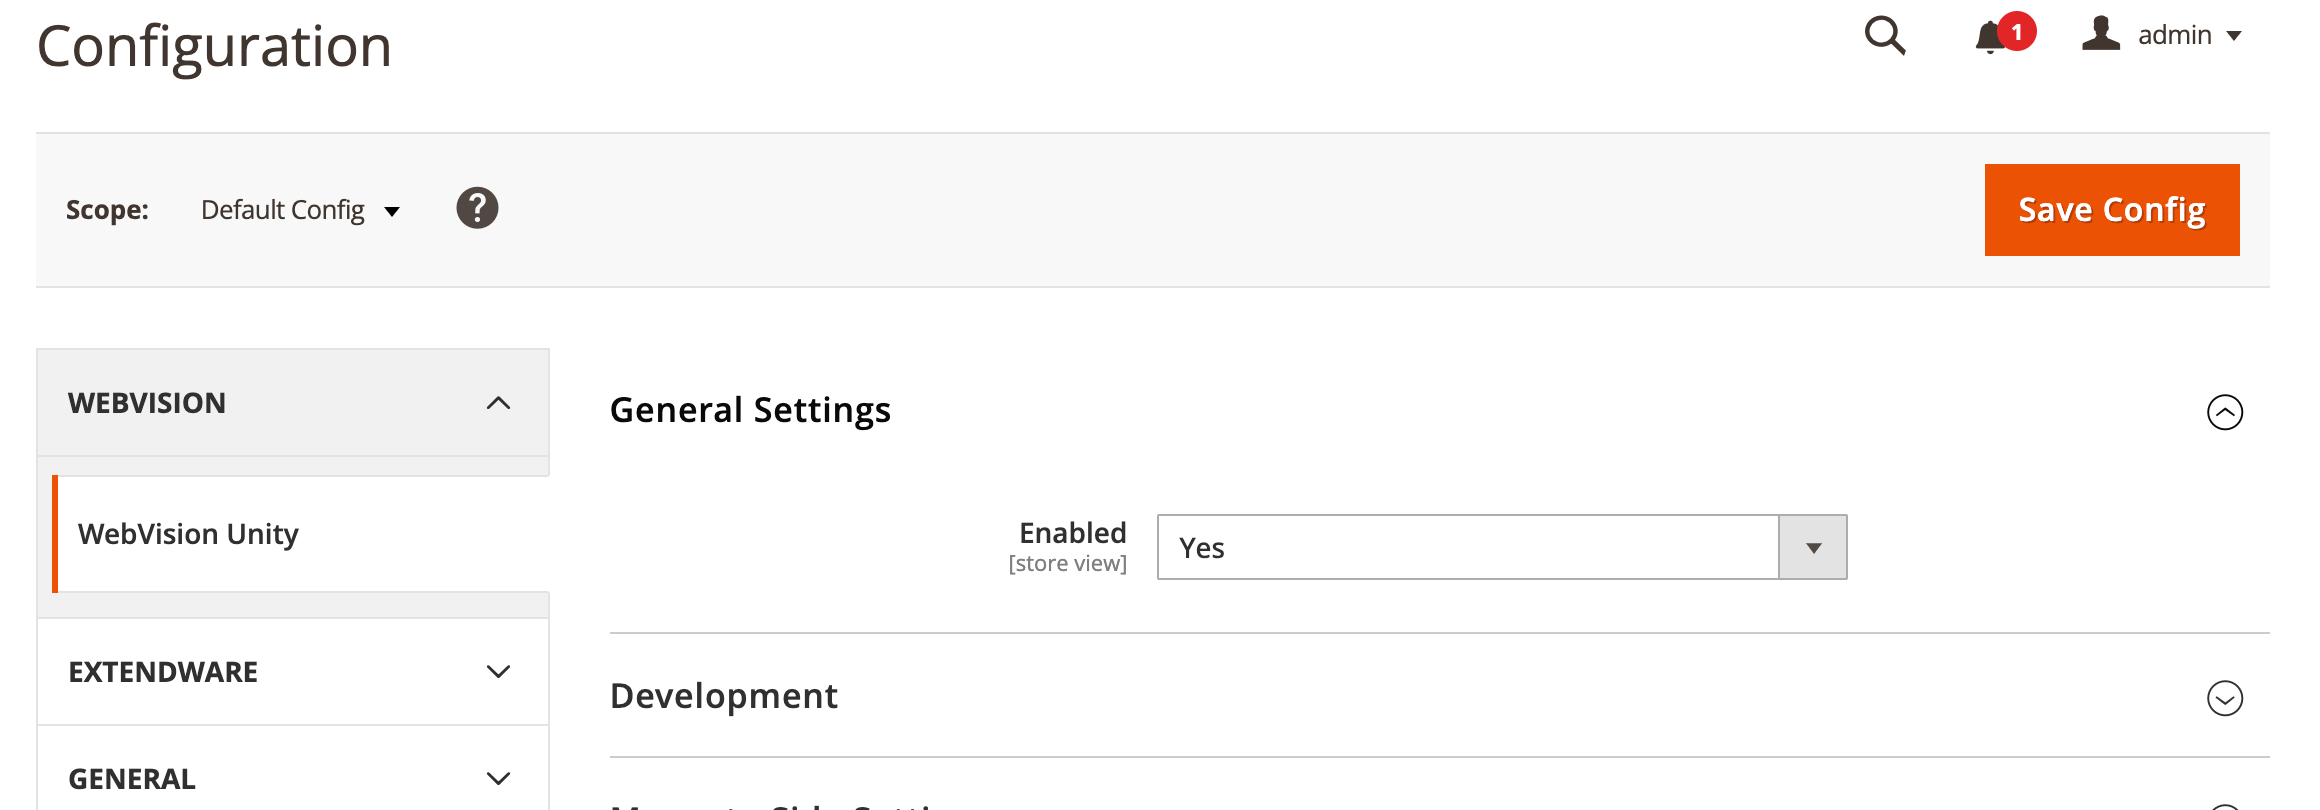
Enabled: Activate or deactivate the extension globally.
Setp 2. - Developer
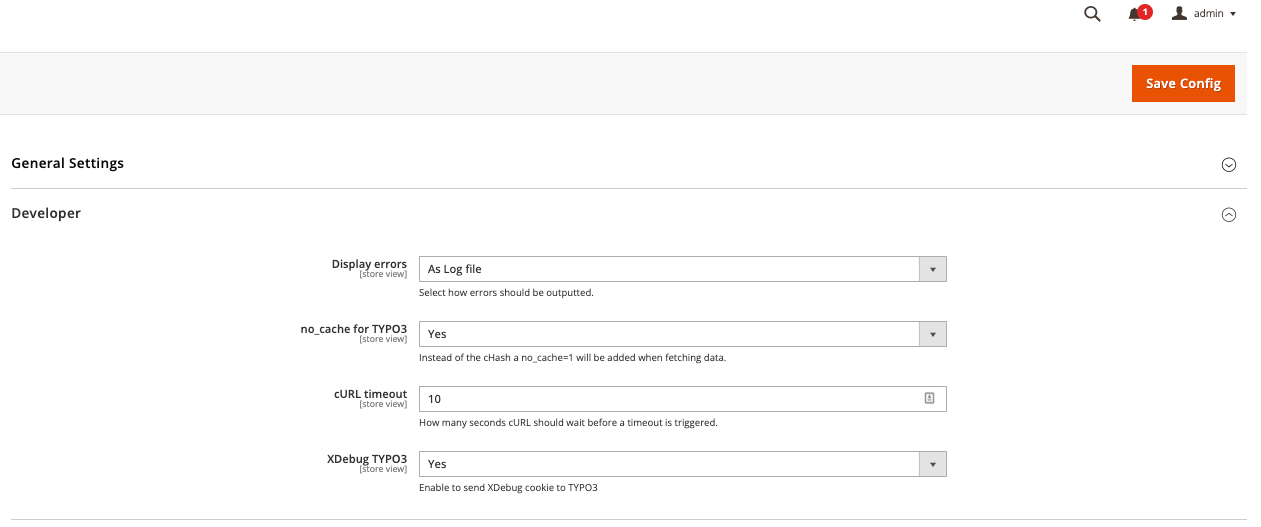
Display errors: Set how errors are displayed.
As HTML Code: Error message is shown directly in the frontend.
As HTML Comment: Error message is hidden in HTML comments in the frontend.
As Log file: Error messages are written to the Magento exception log.
no_cache for TYPO3: If enabled, the parameter “no_cache=1” is used instead of the cHash parameter.
cUrl timeout: Set the timeout for the CURL request to TYPO3 in seconds.
XDebug TYPO3: If disabled, the XDebug cookie is not passed to TYPO3 to avoid slowing down the CURL request.
Setp 3. - Magento side settings
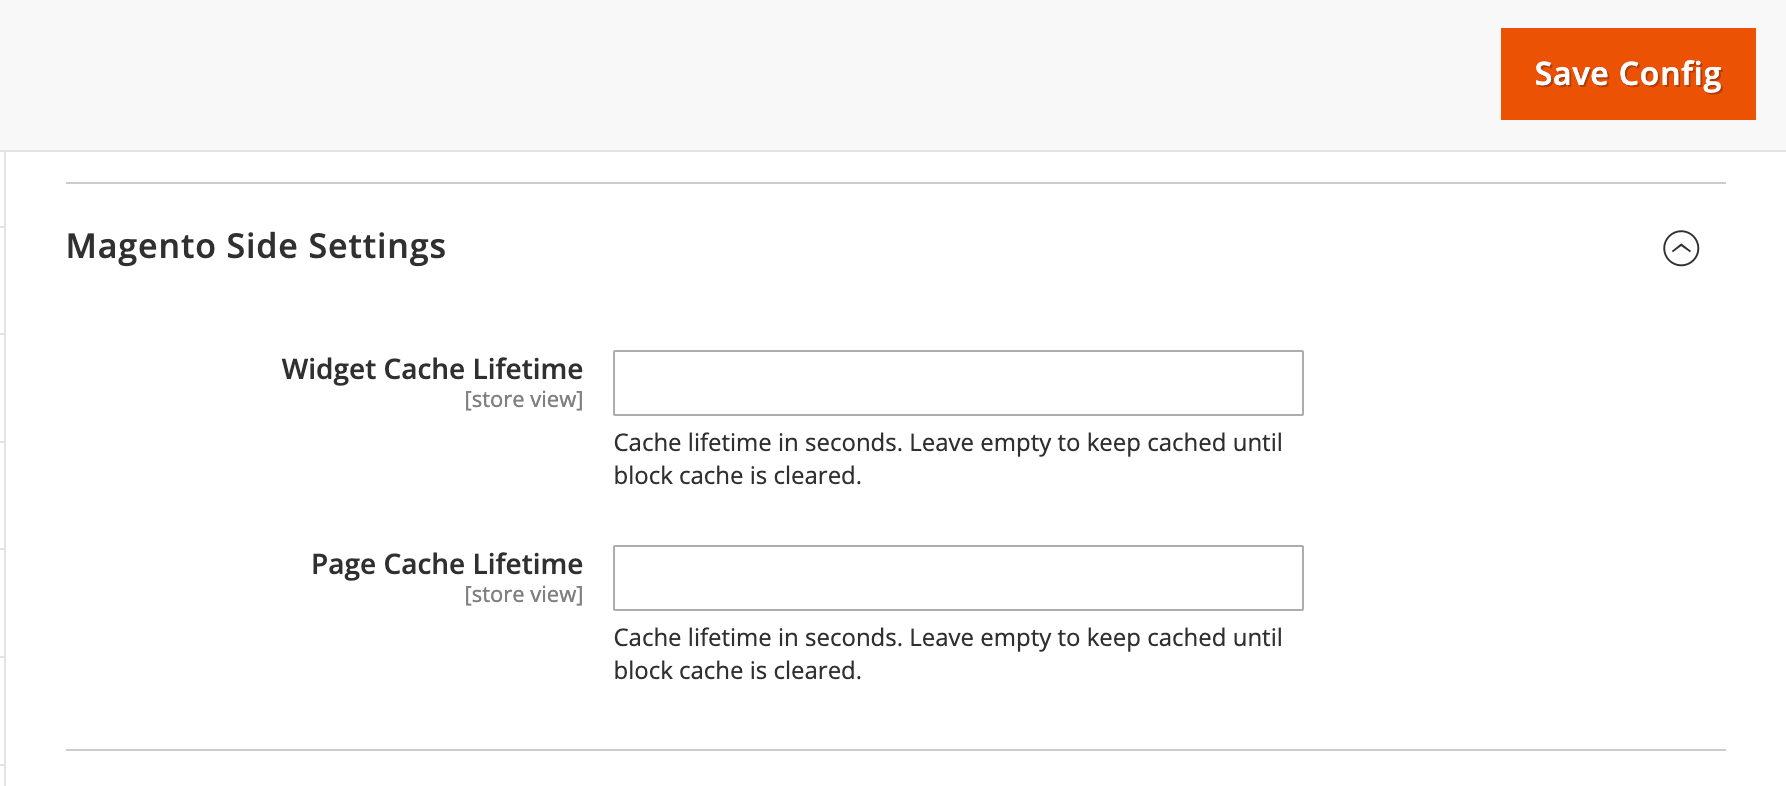
Widget cache lifetime: Set the cache lifetime for webvision_unity/t3block and webvision_unity/t3menu widgets. If empty, the block is cached until the cache is cleared.
Page Cache Lifetime: Set the cache lifetime for pure TYPO3 pages displayed in Magento. If empty, the page is cached until the block cache is cleared.
Setp 4. - TYPO3 side settings
Setp 4.1 Database:
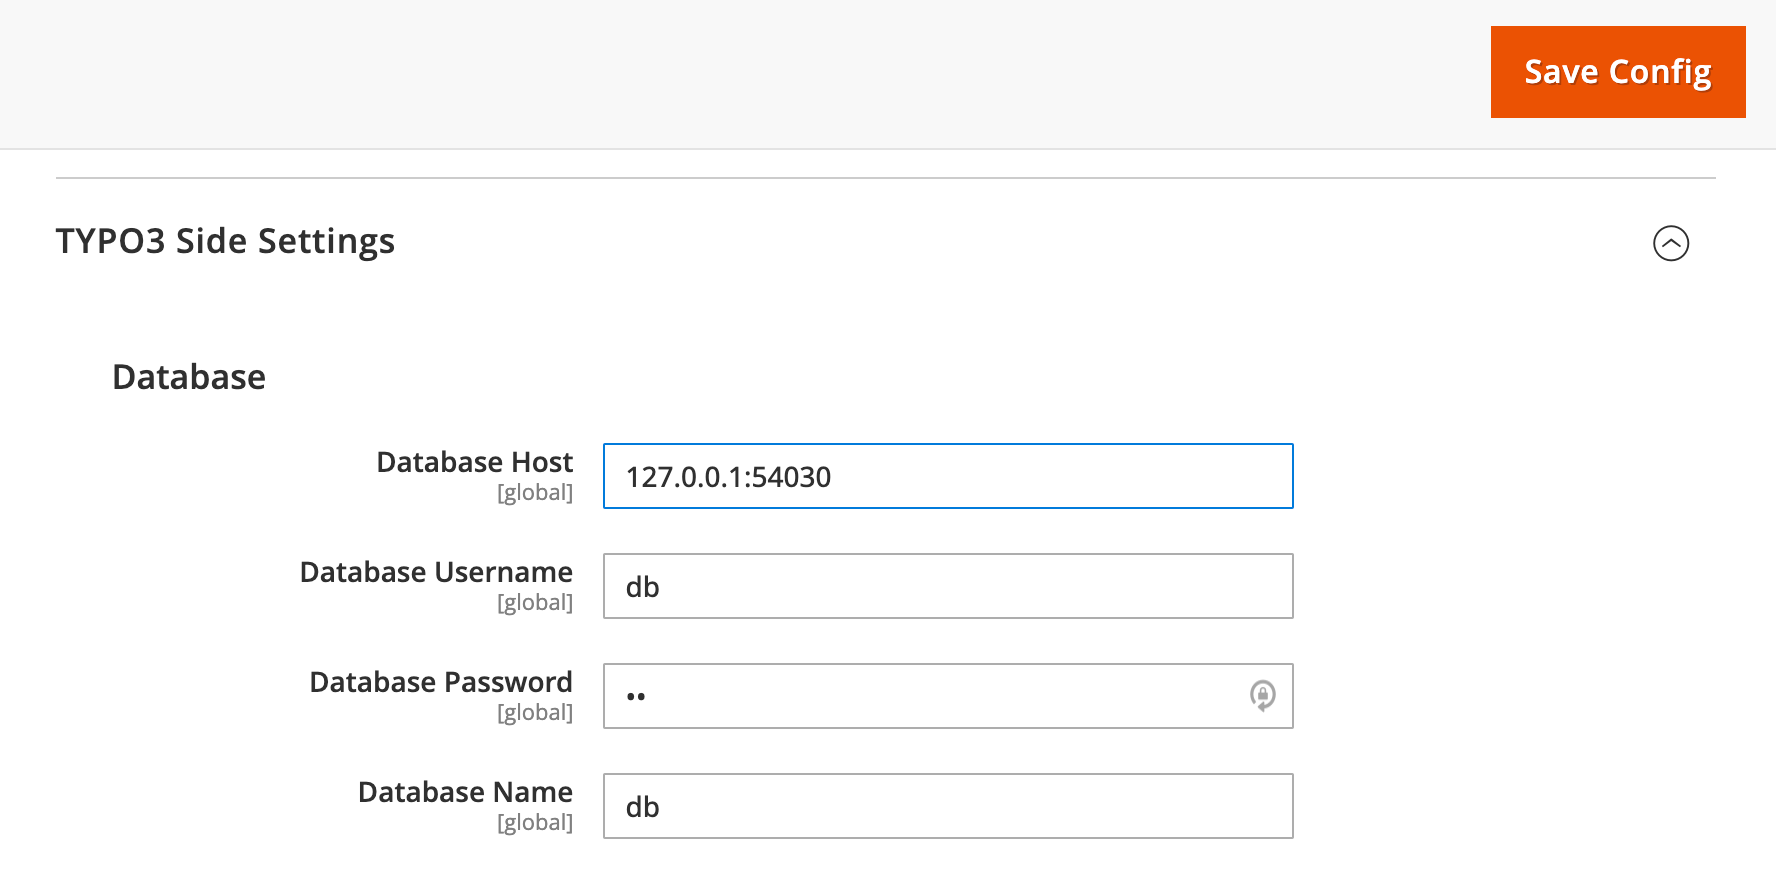
Database Host: The host for the TYPO3 database connection.
Database Username: The username for the TYPO3 database connection.
Database Password: The password for the TYPO3 database connection.
Database Name: The name of the TYPO3 database.
Setp 4.2 Url parts:

Protocol: The protocol for the CURL request.
HTTP only: Always use “http://”.
HTTPS only: Always use “https://”.
Currently Used: Use the current URL’s protocol (either “http://” or “https://”).
Domain: The domain of the TYPO3 instance.
Same as Magento: Use the same domain as Magento.
Own Domain: TYPO3 has its own domain.
The TYPO3 domain: The domain of the TYPO3 instance if it differs from Magento.
Subfolder: Used when TYPO3 is in a subfolder with the same domain as Magento.
Use Subpage: Set to Yes if Magento content is on a subpage.
Url path prefix: The prefix placed in front of the actual path for Magento content on a subpage.
encryptionKey: The encryptionKey from LocalConfiguration.php for generating the cHash.
Setp 4.3 PageTypes:
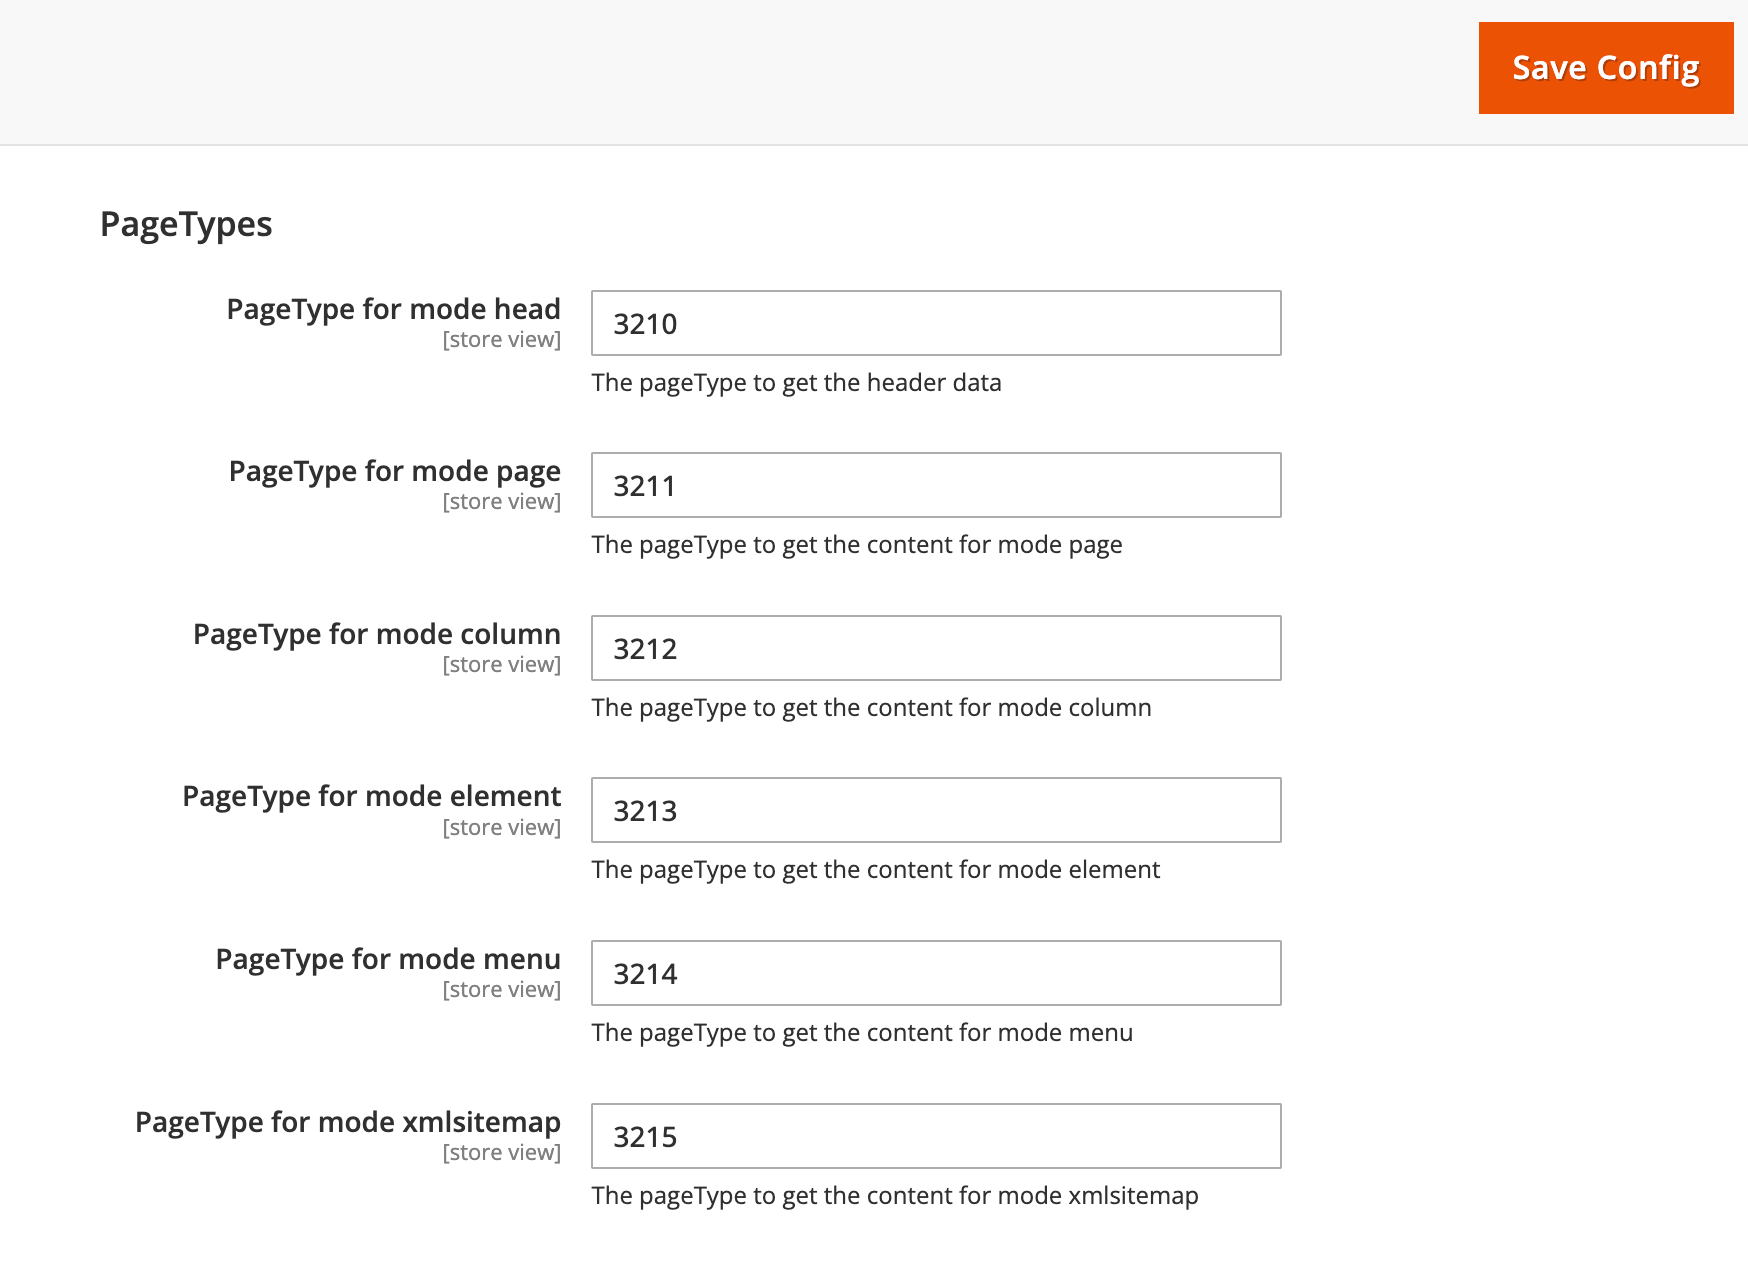
PageType for mode head: The value for the type parameter when querying head data.
PageType for mode page: The value for the type parameter when querying a page.
PageType for mode column: The value for the type parameter when querying a column.
PageType for mode menu: The value for the type parameter when querying a content element.
PageType for mode xmlsitemap: The value for the type parameter when querying the XML sitemap.
Setp 4.4 Additional:
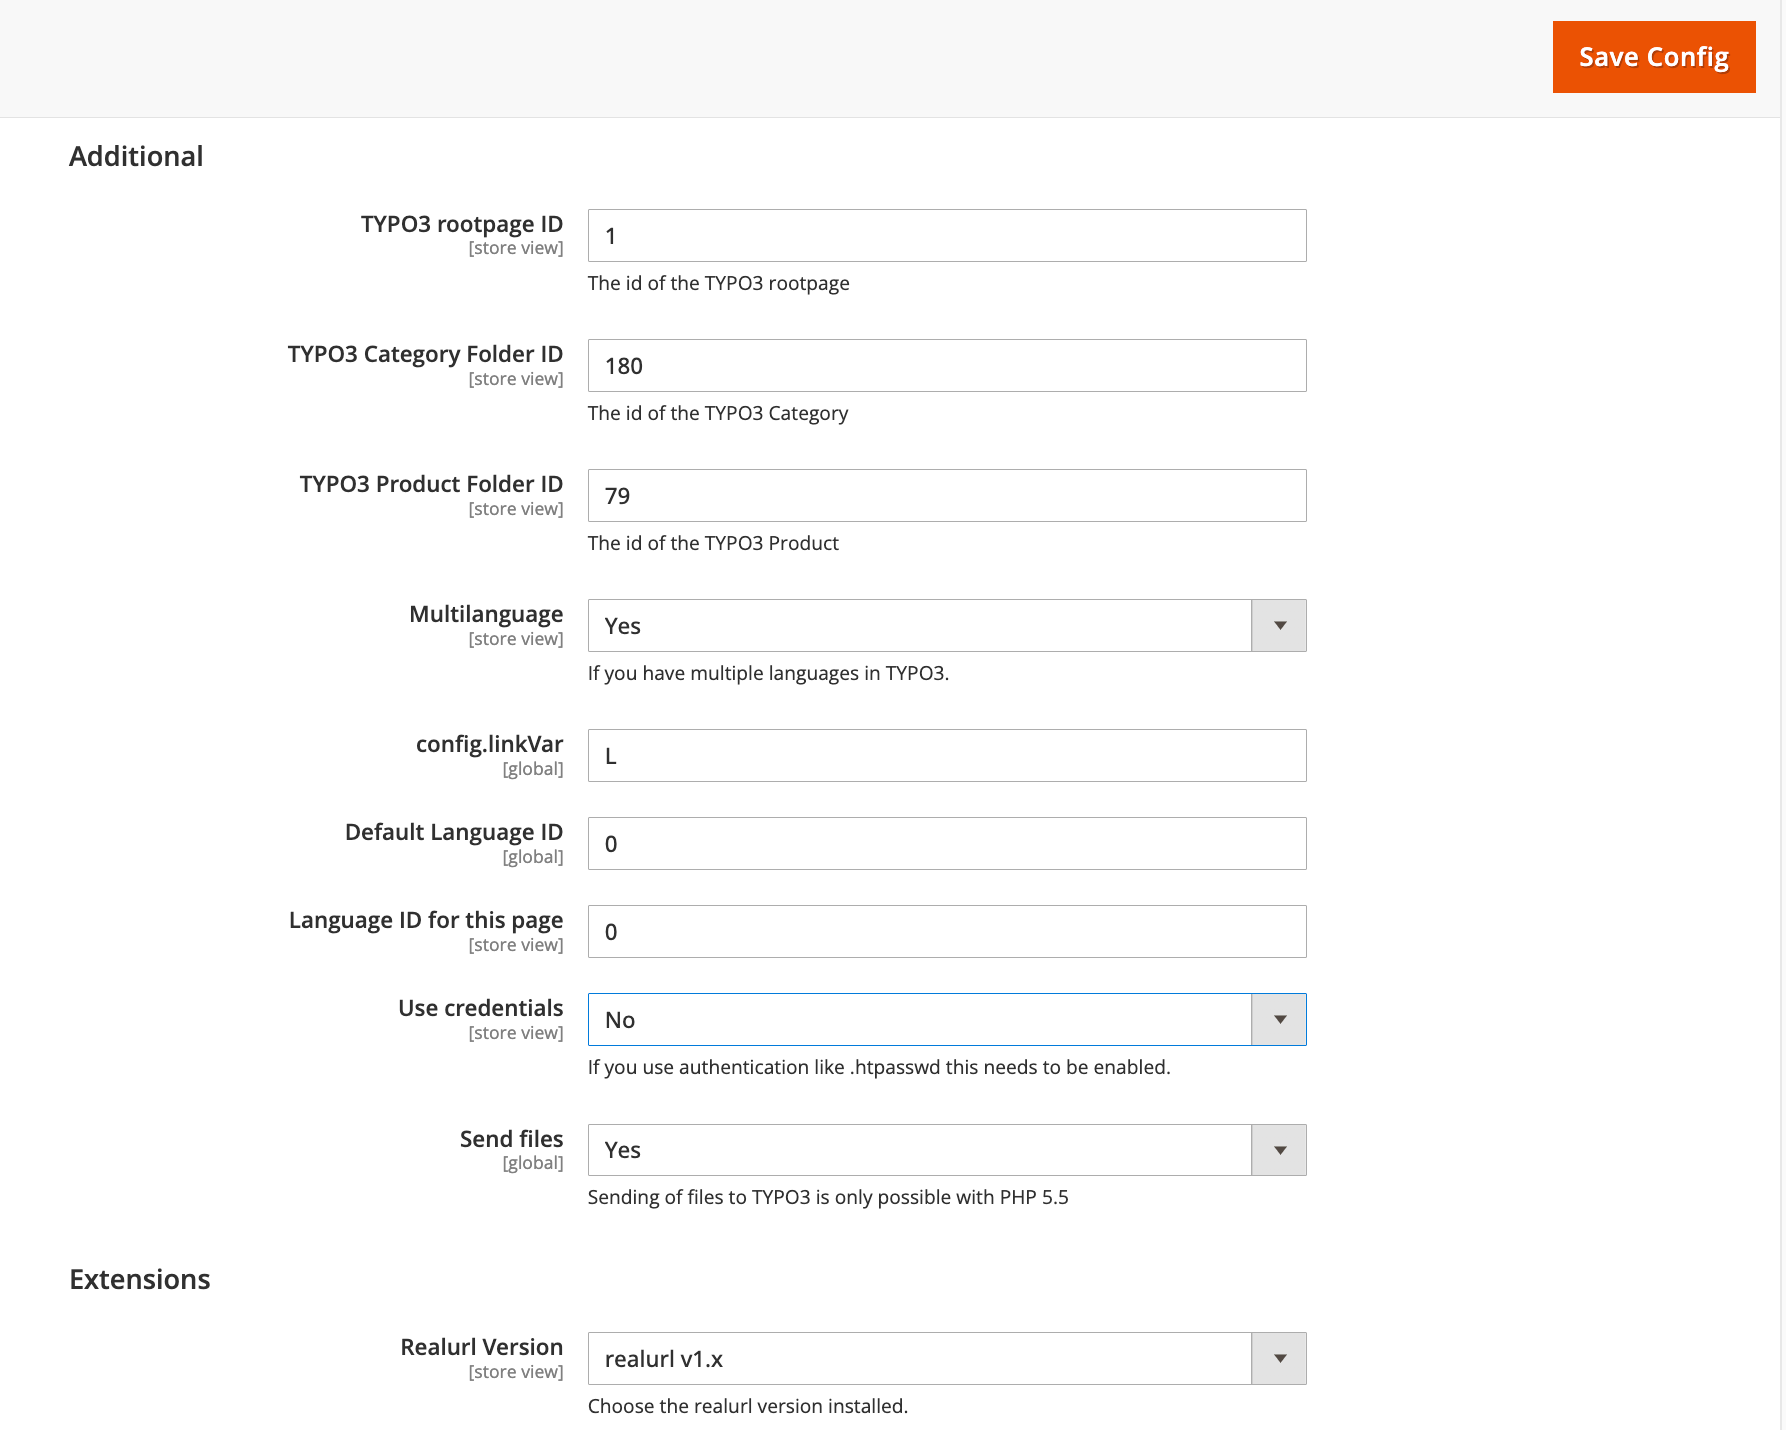
TYPO3 rootpage ID: The UID of the TYPO3 rootpage where the static typoscript of wv_t3unity is stored.
Multilanguage: Enable multilingualism.
config.linkVar: The get parameter for the language (usually “L”).
Default Language ID: The sys_language_uid of the default language.
Language ID for this page: The sys_language_uid for the current Magento language.
Use credentials: Set to Yes if the TYPO3 page is protected by a .htpasswd.
Credential username: The username for the .htpasswd query.
Credential password: The password for the .htpasswd query.
Send files: Choose whether to pass files sent via forms to TYPO3.
Extensions:
Realurl version: Set the realurl version of the TYPO3 instance.
Step 5. - Mode specific settings
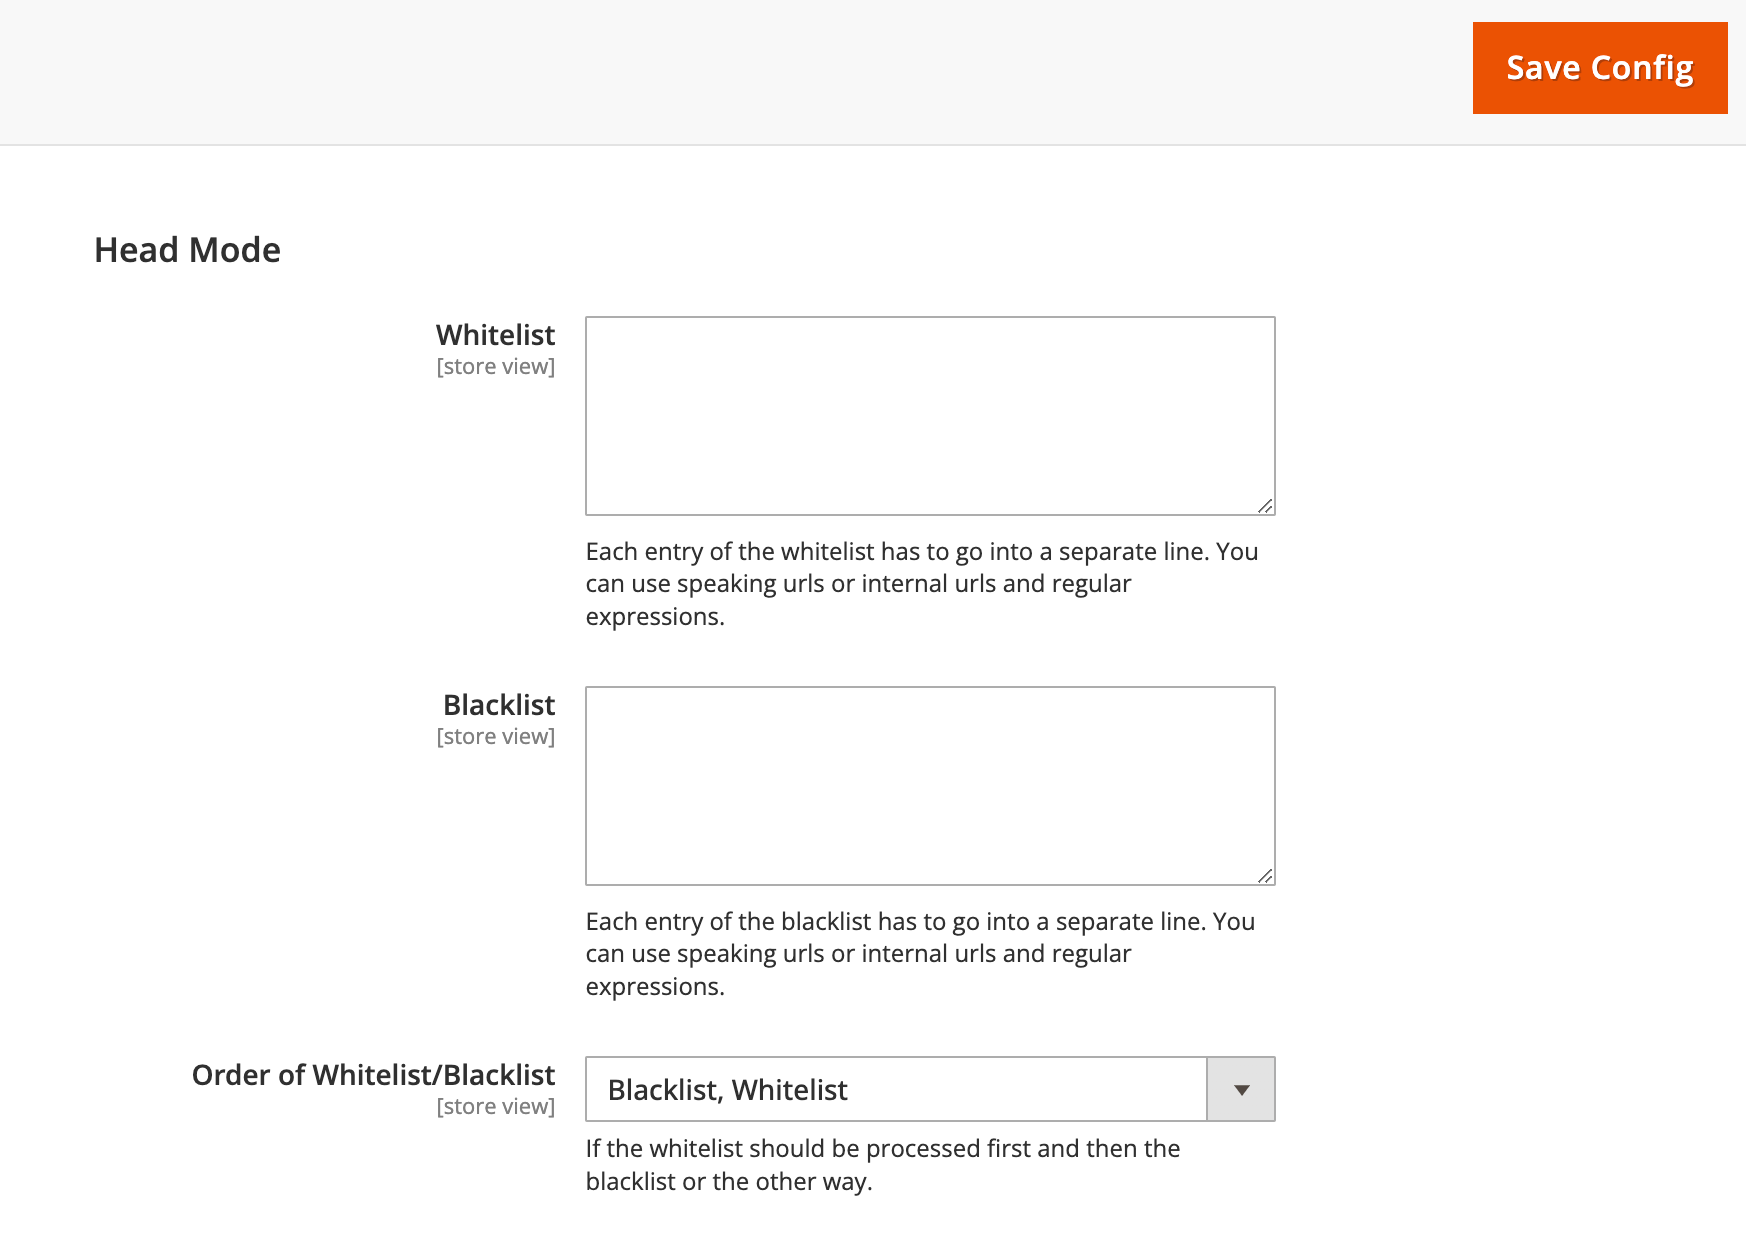
Head Mode:
Whitelist: Regular expressions for allowed paths.
Blacklist: Regular expressions for disallowed paths.
Order of Whitelist/Blacklist: Choose whether to process the blacklist or whitelist first.
Step 6. - Seo settings
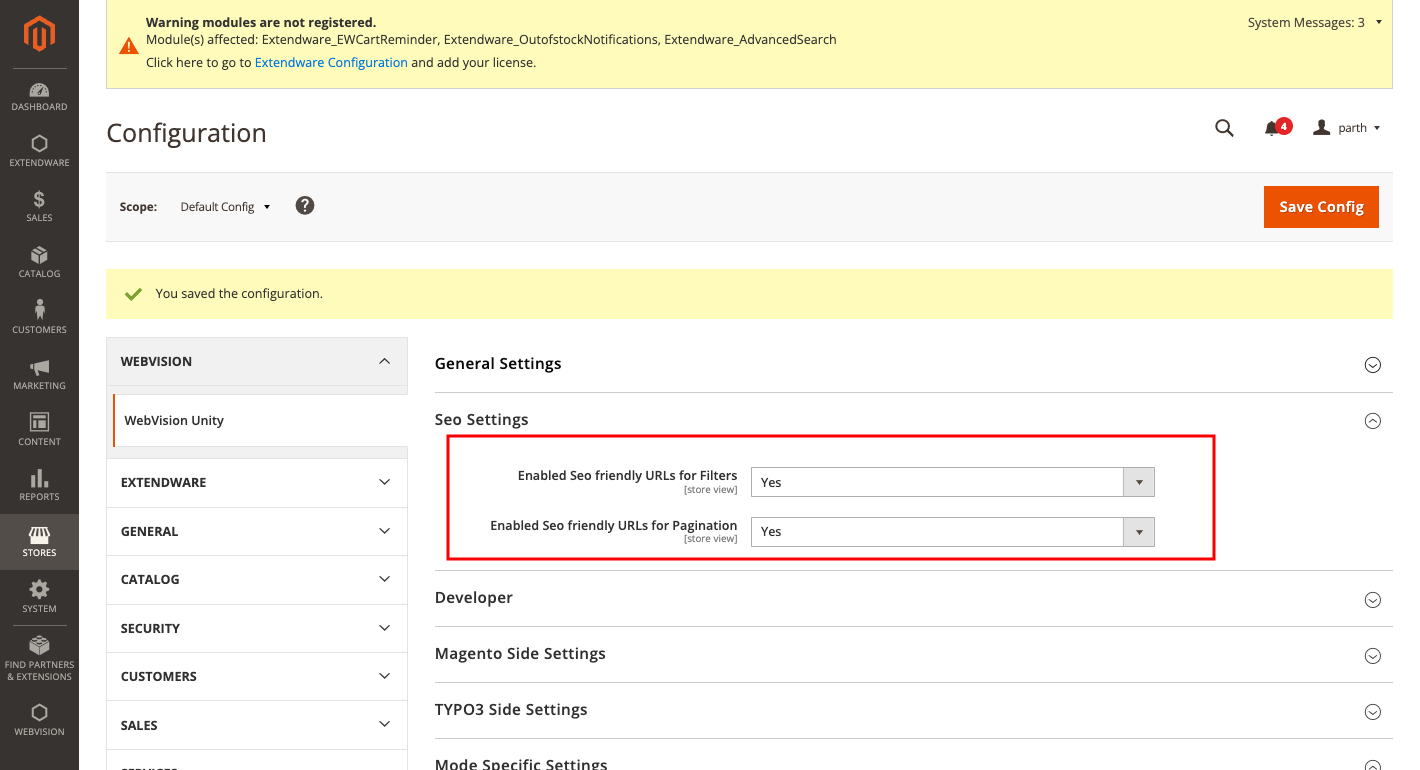
Enable seo friendly url for filter
Enable seo friendly url for pagination
Step 7. - Seo URL Mapping
- 7.1 : URL key mappings
Go to Admin > WebVision > Query Mapping And Click on “Add new query_mapping” button.
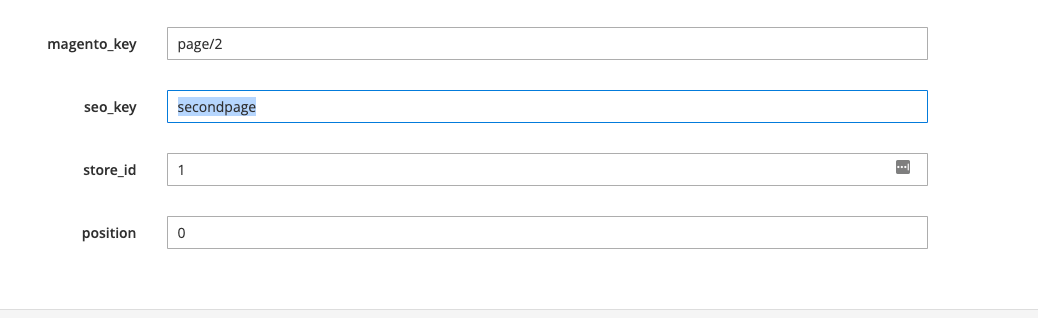
magento_key : In this context, you should input the Magento URL Key that you wish to map with the TYPO3 page URL.
seo_key : Here, you should enter the TYPO3 URL you want to connect with a specific Magento URL key.
store_id : Use this field to provide the store ID, which helps identify the store. Think of it as the store’s identification id.
position : You can specify the position by assigning a numerical value in this field.
Click on Save Query Mapping for the save those settings.
- 7.1 : Example Scenario
Let’s take the scenario where your Magento URL is similar to: https://demo.extendware.com/women/tops-women/jackets-women/page/2.html.
Mapping Creation: Now, suppose you’ve established a mapping as shown in the provided image:
Mapping Image
After Mapping: Once you save this mapping, the URL transforms into: https://demo.extendware.com/women/tops-women/jackets-women/secondpage.html.
This process illustrates how the mapping configuration results in the transformation of the URL structure, providing a clearer and more user-friendly link.
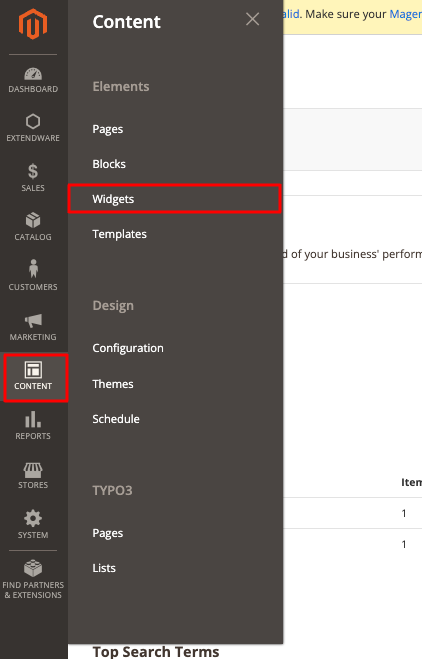
Step 2.2.2 : ADD WIDGETS
- Step 1 : Go to Admin > Content > Widget
Click on the “Add Widget” button. Choose the type of widget you want to create from the available options (TYPO3 Content Block,TYPO3 Menu). Select the widget type that suits your requirements and click on the “Continue” button.
- Step 2 : Widget Storefront Properties And Layout Updates
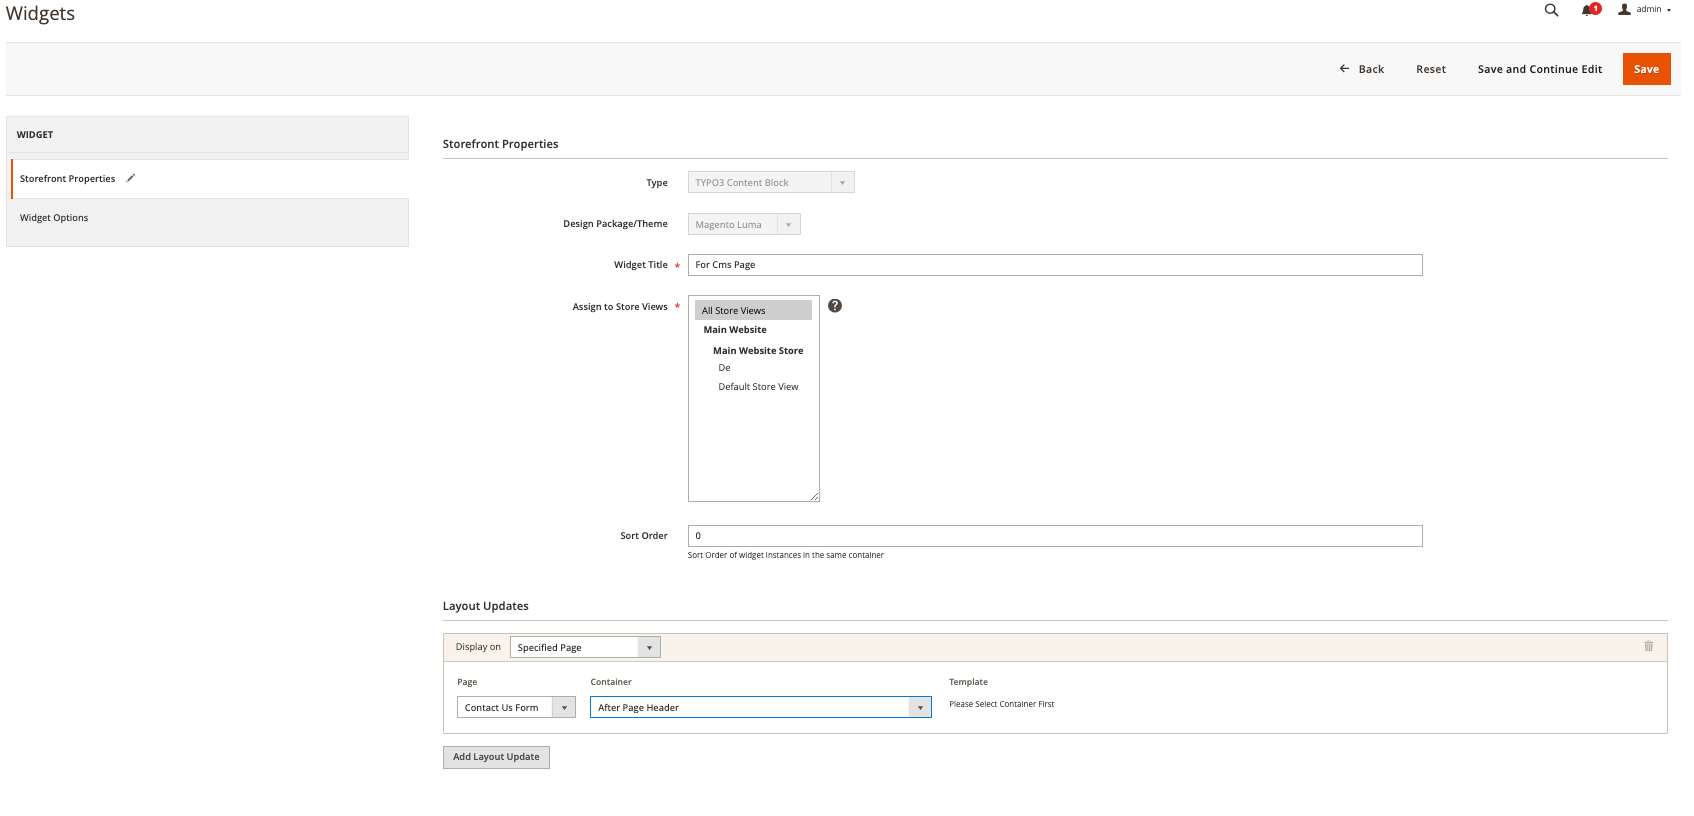
Configure the widget settings by providing the necessary information such as Widget Title, Storefront Properties, Layout Updates, and Widget Options. The options will vary depending on the widget type you selected.
Customize the appearance and behavior of the widget using the available settings. These settings may include selecting a specific CMS block or product list, setting display conditions, specifying the number of items to show, etc.
- Step 3 : Widget Options
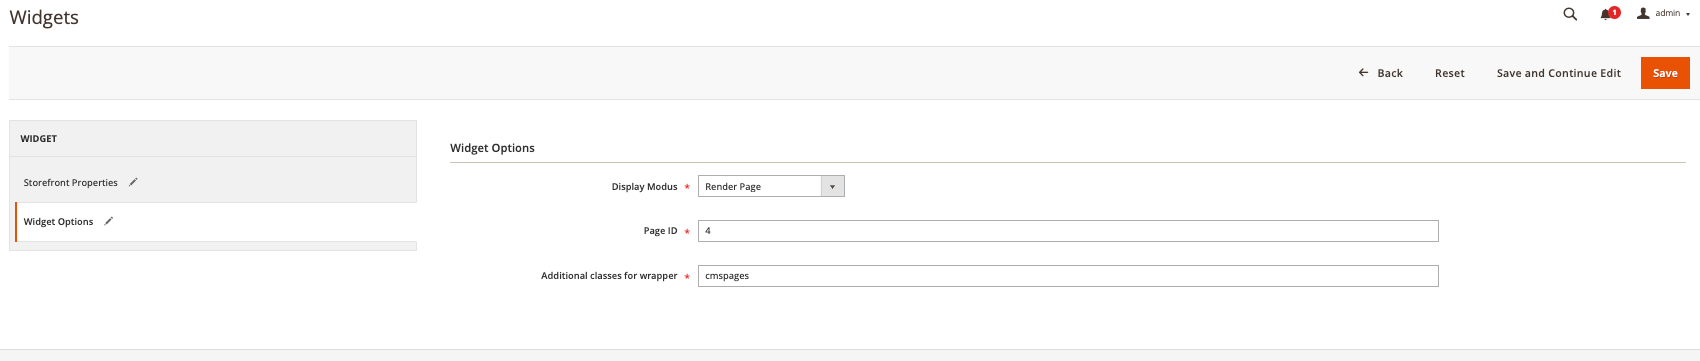
Options:
Display Modus : There are mnay option here. You can use Render Page for render page form typo3.
Render Page: Suppose you choose “Render Page” mode. This lets you incorporate a chosen TYPO3 page by specifying its page ID. The content of the entire TYPO3 page will be displayed in the current context.
Render Column: If you go for “Render Column” mode, you can display a specific column from a TYPO3 page. Just provide the column’s ID, and the content from that column will be shown within your current setup.
Render Content Element: Opting for “Render Content Element” mode enables you to showcase a particular content element from a TYPO3 page. By specifying the element’s ID, you can present that specific content within your current context.
Additional classes for wrapper : You can assign the class for wrapping connetn in this class.
Step 2.2.3 : Enhance your content design by incorporating custom CSS styles.
Go to the Admin > “Content” menu and select “Configuration” under the “Design” section.
In the “Configuration” page, locate the specific theme you want to add CSS to and click on the corresponding “Edit” button.
Scroll down to the “HTML Head” section in the “Theme Configuration” editor.
Add your custom CSS code by wrapping it inside
<style>tags, such as:
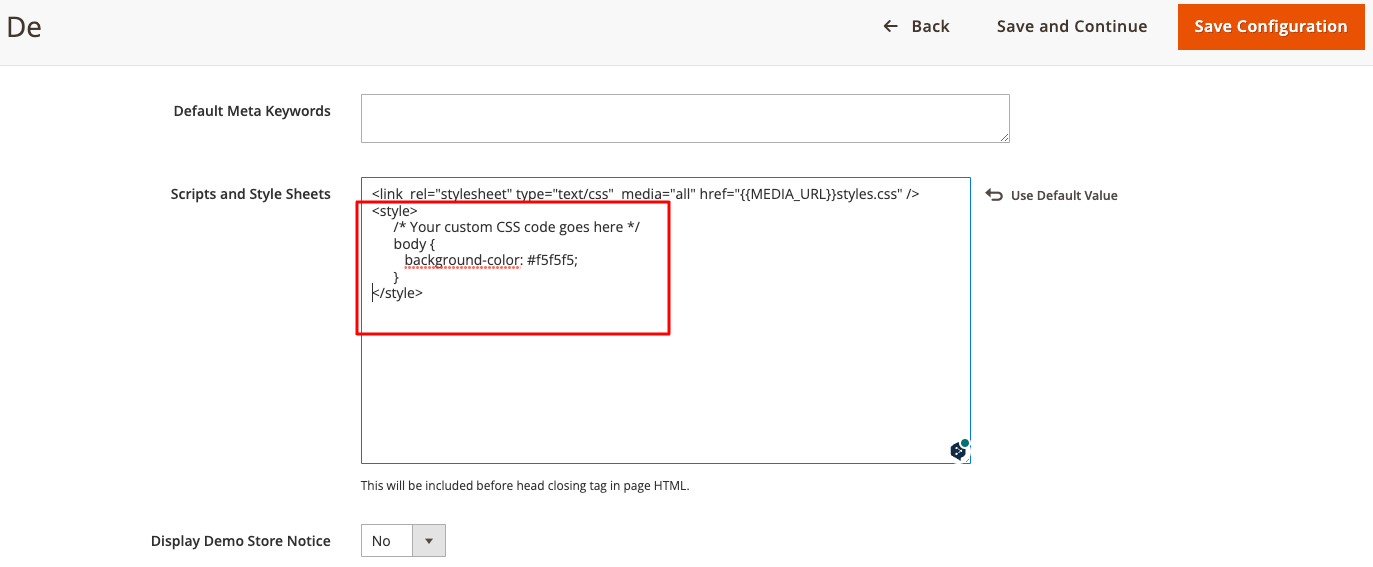
<style>
   /* Your custom CSS code goes here */
   body {
      background-color: #f5f5f5;
   }
</style>
Step 2.3 : DEVELOPER’S GUIDE
2.3.1 : Call typo3 Page into magento
Into CMS dynamic fetch pageID from typo3 by comparing slug:
{{block class="WebVision\Unity\Block\TYPO3\Block" mode="page"}}Into CMS with static page ID:
{{block class="WebVision\Unity\Block\TYPO3\Block" mode="page" page_uid="108"}}Using LayoutXML dynamic fetch pageID from typo3 by comparing slug:
<block class="WebVision\Unity\Block\TYPO3\Block" name="category.unity" before="-">
  <arguments>
    <argument name="mode" xsi:type="string">page</argument>
    <argument name="column_uid" xsi:type="number">1</argument>
  </arguments>
</block>
Using LayoutXML with static page ID*:
<block class="WebVision\Unity\Block\TYPO3\Block" name="category.unity" before="-">
  <arguments>
    <argument name="mode" xsi:type="string">page</argument>
    <argument name="page_uid" xsi:type="number">108</argument>
  </arguments>
</block>
PHTML dynamic fetch pageID from typo3 by comparing slug:
<?php
echo $this->getLayout()
->createBlock('WebVision\Unity\Block\TYPO3\Block')
->setMode('page')
->toHtml();
?>
PHTML with static page ID:
<?php
echo $this->getLayout()
->createBlock('WebVision\Unity\Block\TYPO3\Block')
->setMode('page')
->setPageUid('108')
->toHtml();
?>
2.3.2 : Call typo3 Columns into magento
Into CMS dynamic fetch pageID from typo3 by comparing slug:
{{block class="WebVision\Unity\Block\TYPO3\Block" mode="column" column_uid="1"}}Into CMS with static page ID:
{{block class="WebVision\Unity\Block\TYPO3\Block" mode="column" column_uid="1" page_uid="108"}}Using LayoutXML dynamic fetch pageID from typo3 by comparing slug:
<block class="WebVision\Unity\Block\TYPO3\Block" name="category.unity" before="-">
  <arguments>
    <argument name="mode" xsi:type="string">column</argument>
    <argument name="column_uid" xsi:type="number">1</argument>
  </arguments>
</block>
Using LayoutXML with static page ID*:
<block class="WebVision\Unity\Block\TYPO3\Block" name="category.unity" before="-">
  <arguments>
    <argument name="mode" xsi:type="string">column</argument>
    <argument name="column_uid" xsi:type="number">1</argument>
    <argument name="page_uid" xsi:type="number">108</argument>
  </arguments>
</block>
PHTML dynamic fetch pageID from typo3 by comparing slug:
<?php
echo $this->getLayout()
->createBlock('WebVision\Unity\Block\TYPO3\Block')
->setMode('column')
->setColumnUid('1')
->toHtml();
?>
PHTML with static page ID:
<?php
echo $this->getLayout()
->createBlock('WebVision\Unity\Block\TYPO3\Block')
->setMode('column')
->setColumnUid('1')
->setPageUid('108')
->toHtml();
?>
2.3.4 : Call typo3 element into magento
Into CMS:
{{block class="WebVision\Unity\Block\TYPO3\Block" mode="element" element_uid="18"}}Using LayoutXML:
<block class="WebVision\Unity\Block\TYPO3\Block" name="category.unity" before="-">
  <arguments>
    <argument name="mode" xsi:type="string">element</argument>
    <argument name="element_uid" xsi:type="number">18</argument>
  </arguments>
</block>
PHTML dynamic fetch pageID from typo3 by comparing slug:
<?php
echo $this->getLayout()
->createBlock('WebVision\Unity\Block\TYPO3\Block')
->setMode('element')
->setElementUid('18')
->toHtml();
?>