MAGENTO HIGH SPEED IMPORT (MHSI) FOR MAGENTO 2
OVERVIEW
Magento’s default product import features are limited, especially when dealing with thousands of products from systems like ERP. Standard imports using Magento’s Dataflow can take up to 8-20 seconds per product, which is far too slow for large catalogs.
Additionally, importing configurable products, assigning categories, or handling image imports is not straightforward with Magento’s out-of-the-box functionality.
With the Magento Import Extension developed by Web-Vision, you can now quickly and efficiently import thousands of products into your Magento 2 store in just a few minutes.
PERFORMANCE
MHSI allows you to import 20,000 products into a live Magento store in less than 10 minutes. Performance may vary depending on the product data being imported.
KEY FEATURES
User-Friendly Interface: Easily create and manage import profiles with a graphical interface. Imports can also be executed manually.
Flexible File Handling: Convert XML files to CSV for seamless imports.
Comprehensive Product Support: Import both simple and configurable products, including their relationships.
Advanced Product Linking: Import related, up-selling, and cross-selling products.
Customer Group Pricing: Handle price imports for different customer groups.
Multiple Data Formats: Directly import CSV data or convert XML to CSV within MHSI for flexible data handling.
Configurable Import Profiles: Set up profiles for different data formats from multiple manufacturers.
Full Attribute Management: Automatically import and assign any attribute values, including filterable and selectable options.
Advanced Image Handling:
Import any number of images.
Support image URLs with pre-processing and reuse existing images.
Import images from URLs requiring authentication.
WebP image download support.
Automatically assign images based on product SKUs.
Category Assignment:
Assign products to categories by ID or name.
Support nested category structures.
Automatically create categories if they don’t already exist.
Error Reporting: Receive detailed error messages if there are issues with the import file.
Scheduled Imports:
Use CronJob for time-controlled imports, ideal for tasks like stock updates.
We also provide our MHSI Cron module for automatic imports based on your specified schedule, with history tracking and additional features.
Update Mode: Update individual attributes like names, stock levels, or sizes without a full import.
Multi-Store Support: Import product data across multiple stores within your Magento instance.
Real-Time Import Logs: Import logs are displayed and stored in a single file, allowing you to easily track the imported data.
Selective Import: Choose to import only categories or only products as needed.
Advanced Customization:
Delete specific attribute values for individual products.
Support additional custom product link types.
Generate product URLs with advanced URL key mapping.
.env Connector Support: Enabled support for the
.envconnector via helhum/dotenv-connector for seamless environment configuration management.Integration with Shopware: Import products from Shopware directly into Magento.
DeepL Auto Sync: Extendware DeepL Auto Sync support for automatic translations and updates.
INSTALLATION
Download or Clone MHSI
You can either download the ZIP file or clone the MHSI repository directly from our source.
Ensure the mhsi folder is placed in the root directory of your Magento store.
Composer Installation
Alternatively, you can install MHSI using Composer. Run the following command in the root directory of your Magento installation:
composer require mhsi/mhsi
Unzip and Copy
If you downloaded the ZIP file, unzip it on your local machine.
Copy the mhsi folder into the root directory of your Magento store using an FTP program, or alternatively, clone the repository directly into your Magento installation folder.
Folder Placement
The mhsi folder should be placed alongside core Magento directories like app/ or lib/. Make sure it is located in the Magento root directory for proper functionality.
Create a Symlink for pub Directory (If Applicable)
If your Magento installation uses pub as the document root, you’ll need to create a symbolic link (symlink) from the mhsi folder in the root directory to the pub/mhsi folder. This ensures that the MHSI files are properly accessible.
On a Linux or macOS system, you can create a symlink using the following command:
ln -s /path/to/original /path/to/symlink
For example:
ln -s /var/www/html/magento/mhsi /var/www/html/magento/pub/mhsi
You can also run the following command from the Magento root directory:
ln -s $(pwd)/mhsi $(pwd)/pub || echo 'Symlink already exists'
This command creates a symlink from the mhsi folder in the Magento root directory to the pub/mhsi folder, ensuring the files are correctly linked for access.
If it’s showing a permission issue, you can run the following command because it requires the appropriate permissions:
chmod 777 -R mhsi/*
MHSI INTERFACE OVERVIEW
After successfully installing the MHSI, you can easily access the interface by navigating to the following URL:
https://youronlineshopurl.com/mhsi/config.php
Note: We strongly recommend protecting this folder using htpasswd/htaccess security measures to enhance its security.
Upon entering the MHSI section, you will encounter a user-friendly interface designed to streamline the product import process. Below are some of the key components you will find:
MHSI HOME PAGE
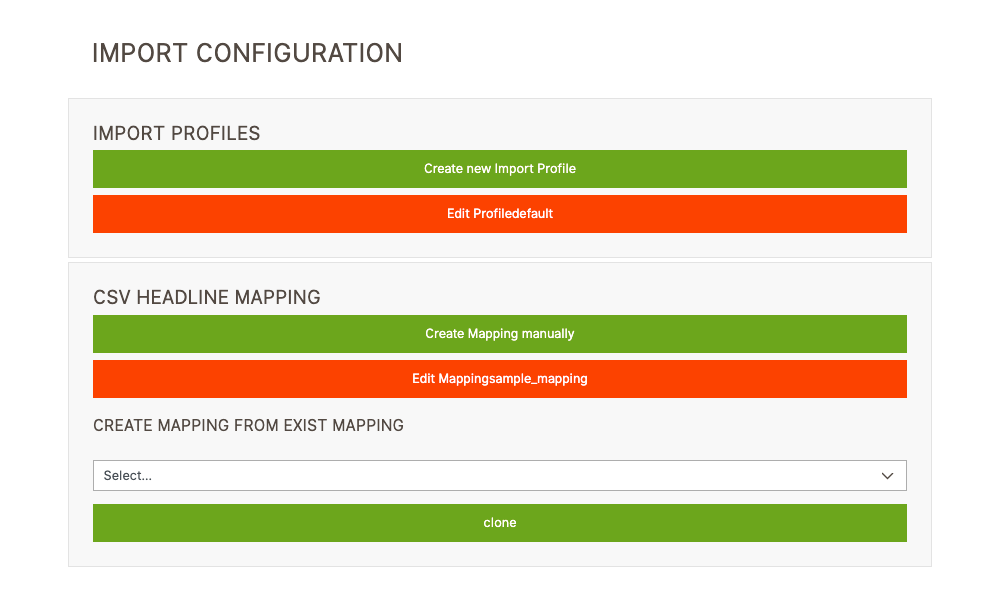
The interface consists of two sections: one for importing products and another for attribute mapping. Let’s review the points below for more details.
Import Profiles
You can create multiple import profiles for different types of products and their associated data.
This feature allows you to manage your product import data according to your specific requirements.
Please note that multiple imports cannot be processed simultaneously; you can only run one import at a time.
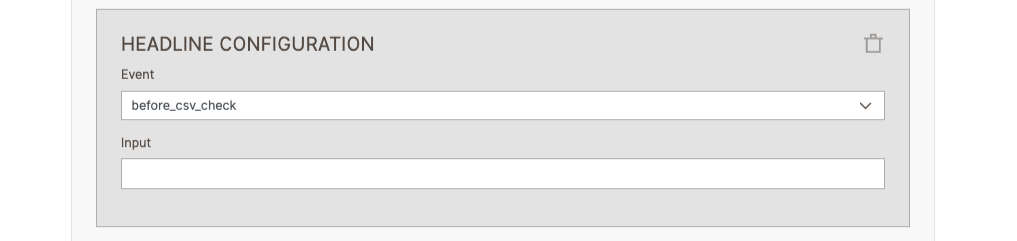
CSV Headline Mapping
This section is dedicated to managing CSV header titles.
Sometimes, the product attribute codes and Magento attribute names may not match. To simplify this process, we have introduced heading mapping.
Here, you can create multiple heading mappings to use in your import profiles.
You can also duplicate existing mapping profiles by using the clone button.
Let’s begin our first import. Before we start, it’s important to understand how to configure profiles and mappings properly.
First, we need to create a CSV attribute mapping for our import CSV file. Click on the Create Mapping Manually button to access the interface shown below.
CREATE NEW MAPPING FILE
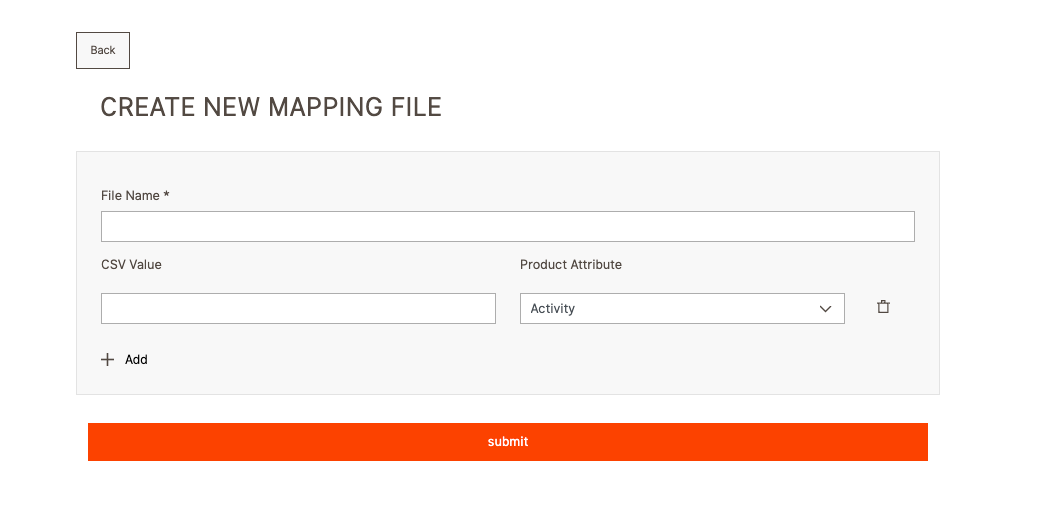
Filename : Please enter a name for your mapping profile. This is a required field. The mapping name will be used in the import profile, so it must be unique and meaningful. Avoid using duplicate names, as this can cause issues during mapping selection.
CSV Value : Please enter the CSV heading title that needs to be mapped to the corresponding Magento attribute.
Product Attribute : Here, you can select the corresponding Magento attribute that is mapped to your CSV heading title.
You can add a mapping by clicking the Add (+) icon, and you can remove a mapping by clicking the Delete icon. To save your changes, be sure to click the Submit button; otherwise, any entered data will be lost.
Once you have completed the attribute mapping in this section, you will need to create an import profile or use the default profile settings based on your requirements.
CREATE NEW IMPORT PROFILE
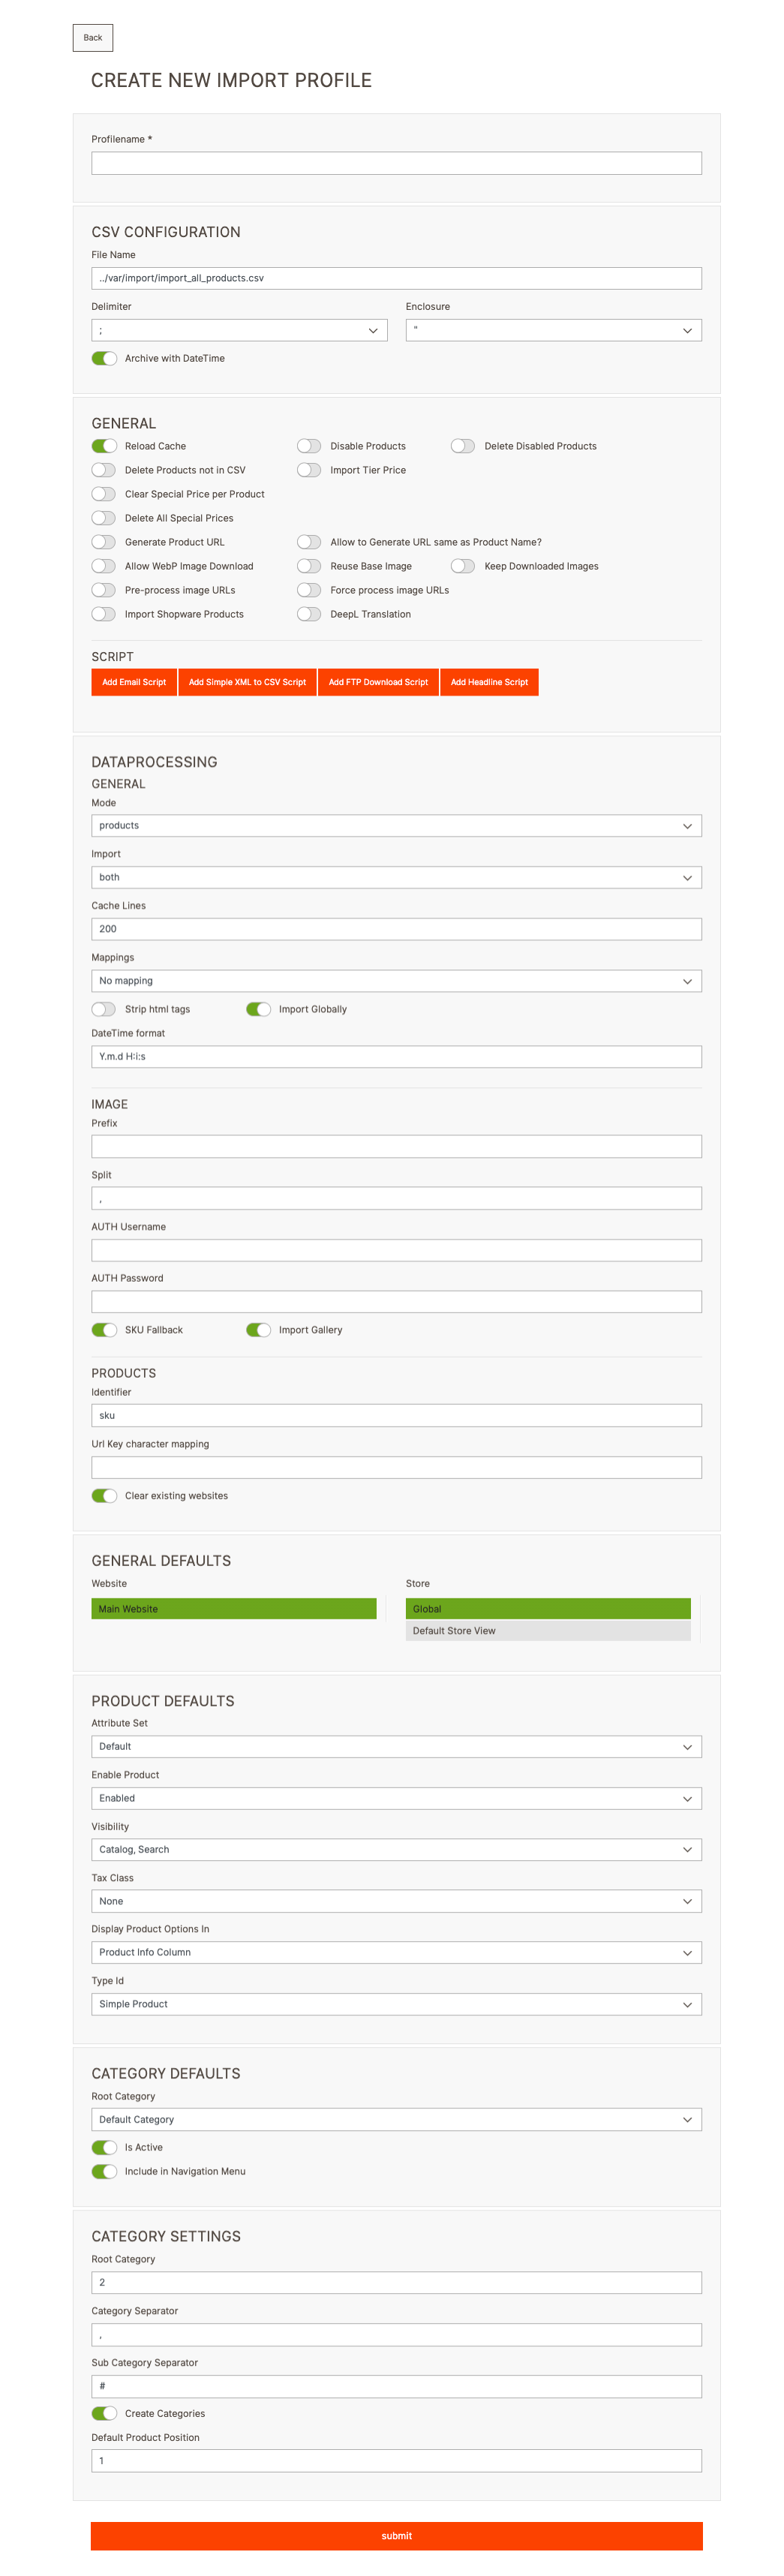
The image above displays the complete import profile configuration. In the following sections, we will explain each component in detail for better understanding.
PROFILE NAME

This is a required field for creating a profile. Please enter a meaningful profile name and ensure that it does not duplicate an existing name.
CSV CONFIGURATION
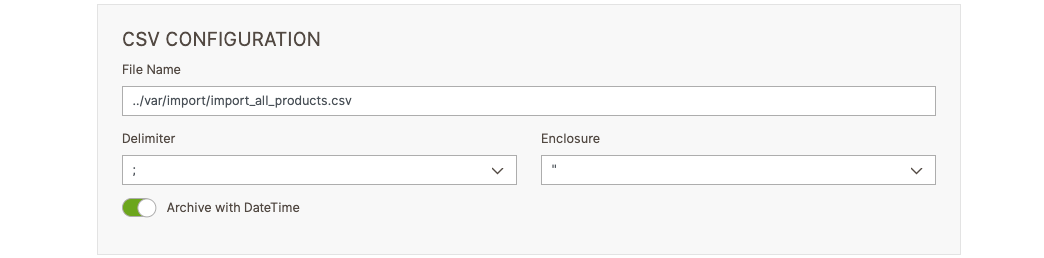
This section provides several configurations that allow customers greater flexibility when working with CSV files. Below are the available configurations:
FileName:
Please enter the relative path to your import CSV file. We recommend placing your import CSV files in the following directory:
magento_root/var/import/yourfile.csv.The default value is:
../var/import/import_all_products.csv.
Delimiter
Please select the appropriate values for your CSV format, including the delimiter characters.
The available delimiters are:
Semicolon (
;)Pipe (
|)Comma (
,)
Enclosure
Please select the appropriate values for your CSV format, including the enclosure characters.
The avaible enclosures are:
Single quote (
')Double quote (
")
Archive with DateTime
If this toggle is enabled, the imported file will be saved in the archive folder with a timestamp indicating when the import was completed.
The archive folder path will be:
magento_root/var/import/archive/yourfile-date-time.csv.By default, it is enabled for the profile.
GENERAL CONFIGURATION
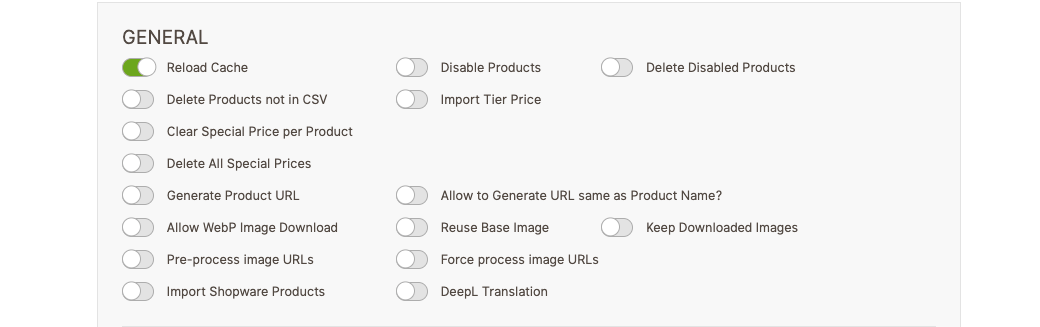
Reload Cache
We use cache for profile data and Magento data within our MHSI core files.
The cache is reloaded at the beginning of the import process.
This option must be enabled; otherwise, any new attribute updates will not be mapped correctly in MHSI.
Disable Products
If this toggle is enabled, it will disable all products before starting the import process.
Delete Disabled Products
If this toggle is enabled, all disabled products will be removed from the database after the import process is completed.
Delete Products not in CSV
If this toggle is enabled, all products that are not included in the CSV will be deleted at the end of the import process.
Import Tier Price
If this toggle is enabled, you can import tier prices for different customer groups.
Some code adjustments will be required, but we have already included sample code for this.
First, navigate to this file:
/magentoRoot/mhsi/bin/processors/Concatenate.php.The default column name for customer groups is group, but you can modify this to match your import CSV structure.
To import customer group prices, follow the example below:
store |
sku |
price |
group1 |
group2 |
group3 |
|---|---|---|---|---|---|
default |
MB-001 |
111.08 |
109.53:1 |
108.97:11 |
109.53:1 |
In this example, after the group columns, the customer group ID (existing in Magento) is specified.
You can also include the price with quantity like this: price:qty
Additionally, add your website array in the _processTierPrice() function within the same file:
$websites = ['website_code1' => [groupIds1, groupIds2, groupIds3], 'website_code2' => [groupIds4, groupIds5, groupIds6]];
This setup ensures that tier prices are correctly mapped to the corresponding websites and customer groups.
Clear Special Price per Product
If this toggle is enabled, the special price for each product in the CSV will be removed.
Delete All Special Prices
If this toggle is enabled, all special prices for products will be removed before the import process begins.
Generate Product URL
If this toggle is enabled, a product URL will be generated if the product’s
url_keyexists.
Allow to Generate URL same as Product Name?
If this toggle is enabled, Generate Product URL (point 8) must also be enabled.
If the imported product CSV does not contain a
url_keycolumn or theurl_keyvalue is missing, aurl_keywill be automatically generated based on the product name and used for the product URL.If the generated product URL already exists for the same store, the product ID will be appended to the end of the URL to ensure uniqueness.
Allow WebP Image Download
If this toggle is enabled, it allows downloading images in WebP format and storing them in the Magento database as
.jpgfile name, since Magento does not support WebP images by default.After the import is completed, you can convert all
.webpimages to.jpg.For more information, you can refer to this CLI command to convert WebP images to JPG.
Reuse Base Image
If this toggle is enabled, the small and thumbnail images will be assigned the same value as the base image if no separate values are provided.
Download Image Path:
magentoRoot/pub/media/import/
Keep Downloaded Images
If this toggle is enabled, downloaded images will be stored in the
magentoRoot/pub/media/import/folder.
Pre-process image URLs
If this toggle is enabled, the images will be pre-downloaded before the import, which reduces the overall import time.
This feature is particularly useful when products have multiple image URLs.
It also prevents the re-downloading of existing images, as all images are stored in the
magentoRoot/pub/media/import/folder.
Force process image URLs
If this toggle is enabled, Pre-process Image URLs (point 13) must also be enabled.
This setting allows the re-download of the same images, as sometimes different images may have the same file name. This provides customers with the option to choose images selectively for import into products.
Import Shopware Products
If this toggle is enabled, you can import products from Shopware 5 into Magento 2.4.x
For a demonstration, please feel free to request a demo.
DeepL Translation
If this toggle is enabled, it allows translations based on our module.
The DeepL Auto Sync module must be installed to use this feature.
SCRIPT CONFIGURATION

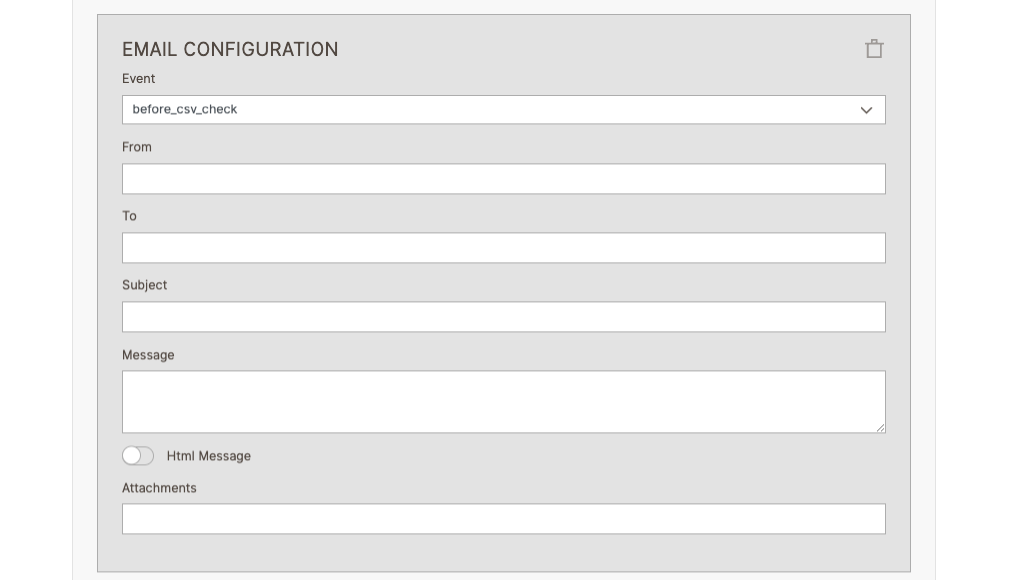
Add Email Script: Enables the sending of emails based on selected import events.
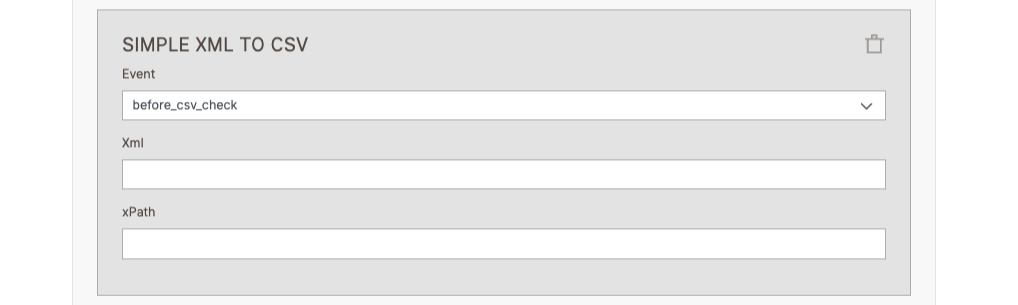
Add Simple XML to CSV Script: Converts XML files into CSV format before the import process.
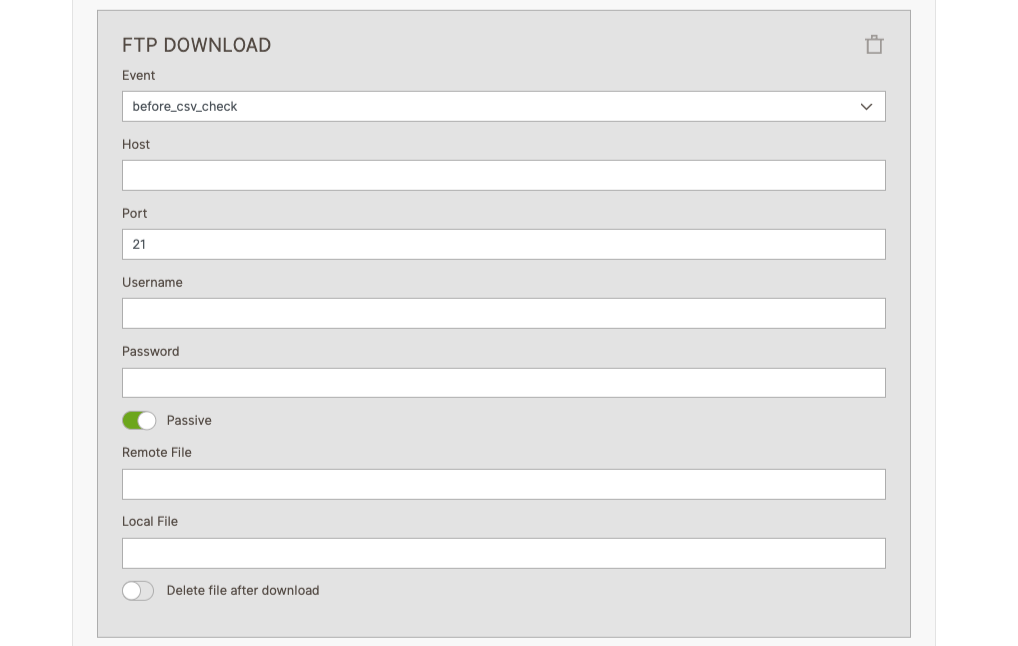
Add FTP Download Script: Provides the capability to download files from FTP using specified credentials and import them into your system.
Add Headline Script: Enables the use of custom headers for the import CSV.
DATA PROCESSING
General
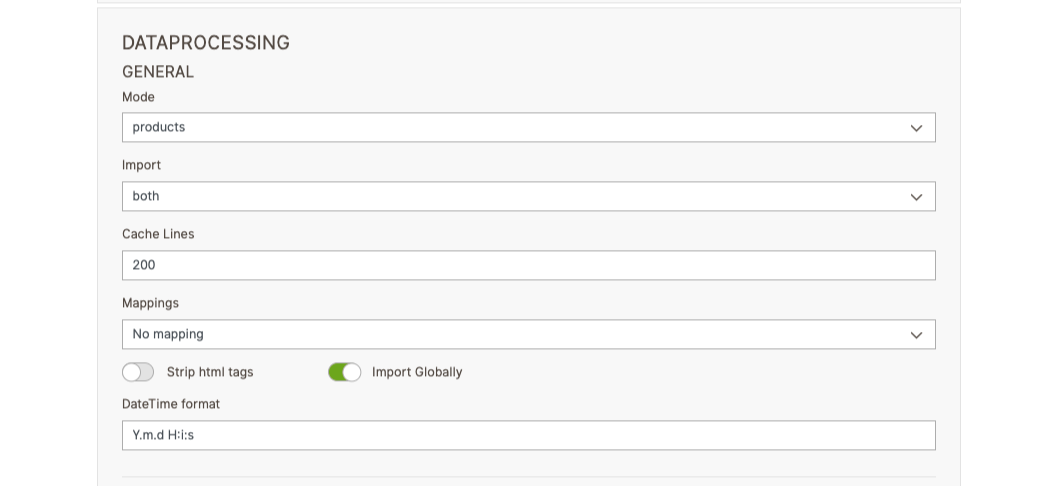
Mode: There are two modes available:
products: Used for importing or updating products.
categories: Used for importing or updating categories.
Import: There are three import modes available:
Import: Only imports new products; existing product data is not updated.
Update: Only updates existing products; no new products are imported or created.
Both: Processes both importing/creating new products and updating existing ones.
Cache Lines
Specify the number of lines to be read and processed together during the import.
Mappings
Select the mapping profile you’ve created for the import. If no mapping is needed, choose “No mapping.”
Strip html tags
If this toggle is enabled, HTML tags will be removed from varchar and text attributes during the import.
Import Globally
If this toggle is enabled, the data will be imported at the global scope, affecting all store views.
DateTime format
You can specify the default date and time format to be used if the format in the CSV is not recognized by PHP.
Image
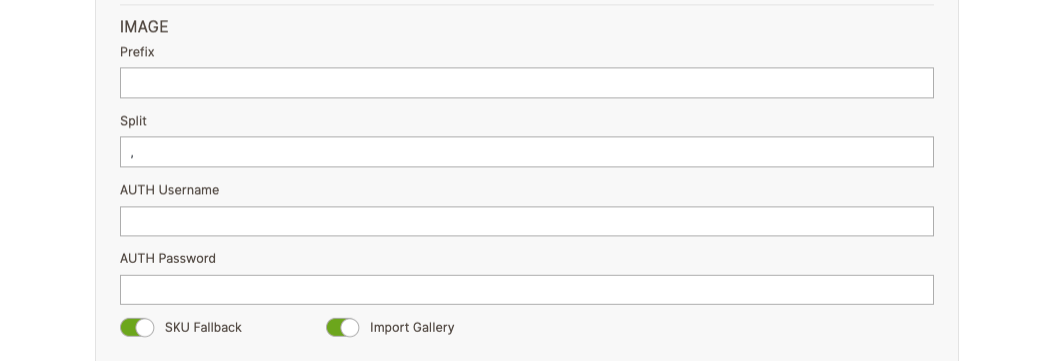
Prefix
Set a prefix for the image filenames.
Split
Define a separator if multiple images are listed.
AUTH Username
When importing images via URL, some URLs may require authentication. Add the authentication username here.
AUTH Password
Similar to the AUTH username, enter the authentication password for protected image URLs.
SKU Fallback
If this toggle is enabled, the SKU will be used as a fallback if no base image, small image, or thumbnail is found.
Import Gallery
If this toggle is enabled, to allow the import of gallery images.
Image Import Options
You can import images into your Magento products in two ways:
Physical Image Placement
Place your images in the following directory of your Magento system:
pub/media/import.
Using Image URLs
You can add image URLs directly into the image columns, and they will automatically be downloaded and assigned to your products.
We support the import of three image types:
Base Image
Column Name:
imageUsage: This is the main image displayed for the product.
Input Options: You can either provide the image name (if it’s stored in
pub/media/import), or you can provide a valid image URL.Multiple Images: If you have more than one image, separate them with a comma. The first image will be set as the base image, and any additional images will be added to the product’s gallery.
Small Image
Column Name:
small_imageUsage: This is used for displaying the small version of the product image.
Input Options: You can either provide the small image name (from
pub/media/import) or add a valid image URL.Multiple Images: Use a comma to separate multiple small images. The first one will be used as the small image, while the others will be added to the gallery.
Thumbnail
Column Name:
thumbnailUsage: This is the thumbnail image for the product.
Input Options: You can either provide the thumbnail image name (from
pub/media/import) or add a valid thumbnail image URL.Multiple Images: You can separate multiple thumbnail images with a comma. The first one will be used as the thumbnail, while the others will be added to the gallery.
In all cases, if you provide multiple images, the first image will be assigned to the specified image type (base, small, or thumbnail), and any additional images will be automatically added to the product’s image gallery.
Products
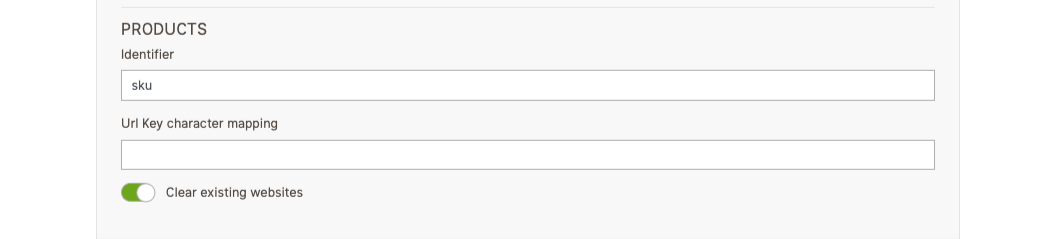
Identifier
Define the product identifier to be used during import.
By default, Magento uses the
SKUas the identifier, and the default value is set tosku.
Url Key character mapping
If a product contains a
url_keyvalue with special characters or umlauts, this mapping field allows for automatic replacements.You can define the mapping in the format:
$->dollar,&->and.For example, if a product URL contains
$or&, the system will automatically replace them withdollarandand, respectively.The Generate Product URL option must be enabled to use this feature.
Clear existing websites
If this toggle is enabled, all existing product website associations will be cleared before new relations are established during the import process.
GENERAL DEFAULTS

In this section, you need to select the website and store for the profile where you intend to process the import. Please review the following points to import into multiple stores:
Store View
If you have multiple stores, you must use the store column with the respective store code or ID while importing products.
Column Name: store
Column Value: store view ID or store view code
Multiple store codes or IDs should be separated by commas.
If you do not add the store column, the same product will be added to the default selected store of the profile.
Website
If you have multiple websites, you should use the websites column with the respective website code or ID while importing products.
Column Name: websites
Column Value: website ID or website code
Multiple website codes or IDs should be separated by commas.
If you do not add the store column, the same product will be added to the default selected store of the profile.
Note: Your MHSI profile must have websites and store views selected.
PRODUCT DEFAULTS
In this section, the selected values are imported as default values if there are no corresponding values in the import CSV. If necessary, these values can be edited in the profile. MHSI provides a few default settings, as shown below:
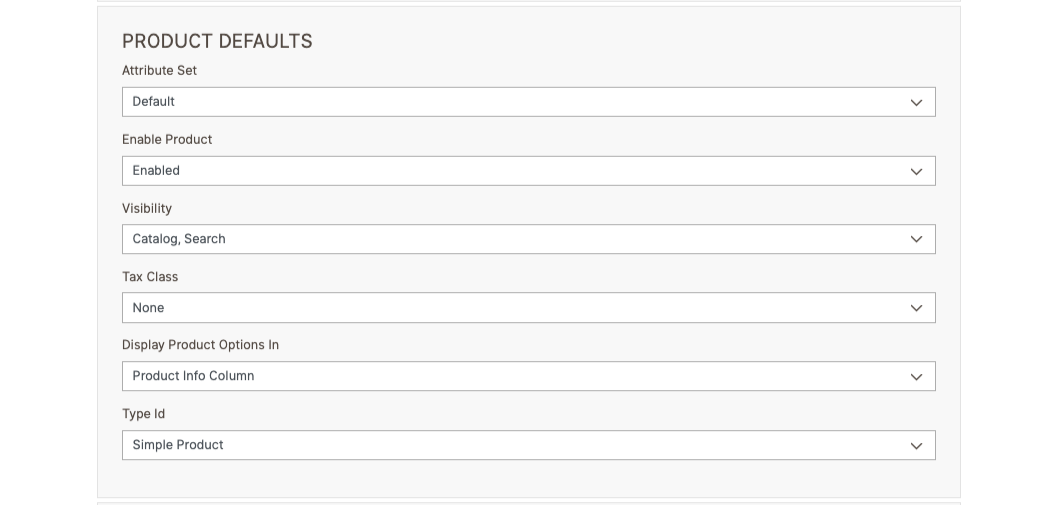
Attribute Set
The default product attribute set is Default.
Enable Product
The default setting for product status is Enabled.
Visibility
The default visibility setting for products is Catalog, Search.
Tax Class
The default tax class for products is None.
Display Product Options In
The default setting for displaying customer options is Product Info Column.
Type Id
The default product type is Simple.
MHSI only supports Simple and Configurable product types. By default, products are imported as Simple product types.
To import Configurable products, specific field values are required. Please review the data requirements for importing configurable products below.
name |
sku |
price |
type_id |
product_options |
size |
color |
configurable_product |
|---|---|---|---|---|---|---|---|
Main Product Config |
MB-01-CONFIG |
100 |
configurable |
size,color |
|||
Child Product 1 |
MB-01-SIMPLE-1 |
100 |
simple |
X |
Red |
MB-01-CONFIG |
|
Child Product 2 |
MB-01-SIMPLE-2 |
100 |
simple |
X |
Blue |
MB-01-CONFIG |
Key Requirements
type_id: The main product must be set as configurable, while the child products should be marked as simple.
product_options: This field must specify the attributes that will be used for the product options (e.g., size and color).
configurable_product: This field must reference the SKU of the main configurable product for each child product.
Important Notes: The attribute values (e.g., sizes, colors) must match the admin values defined in the Magento attribute section. This ensures that the import process recognizes the attributes correctly.
CATEGORY DEFAULTS
In this section, we provide default values for category import. If necessary, these values can be edited in the profile. MHSI offers a few default settings, as shown below:
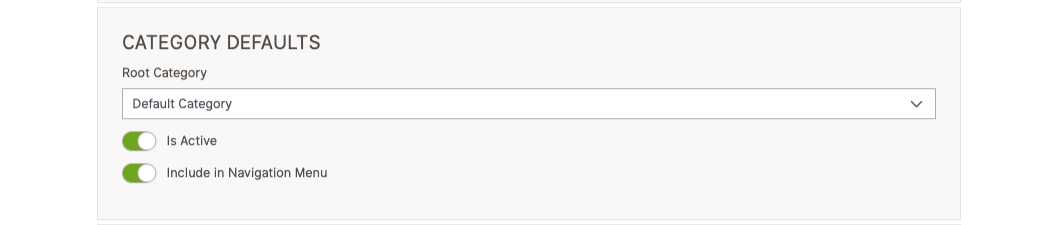
Root Category : The first default category will be shown here. If sample data is installed, it will display the value as Default Category.
Is Active : The default setting for the Is Active option for categories is set to Enable.
Include in Navigation Menu : The default setting for Include in Navigation Menu for categories is also set to Enable.
CATEGORY SETTINGS
For importing categories, please specify the following required details. MHSI offers several settings, as shown below:
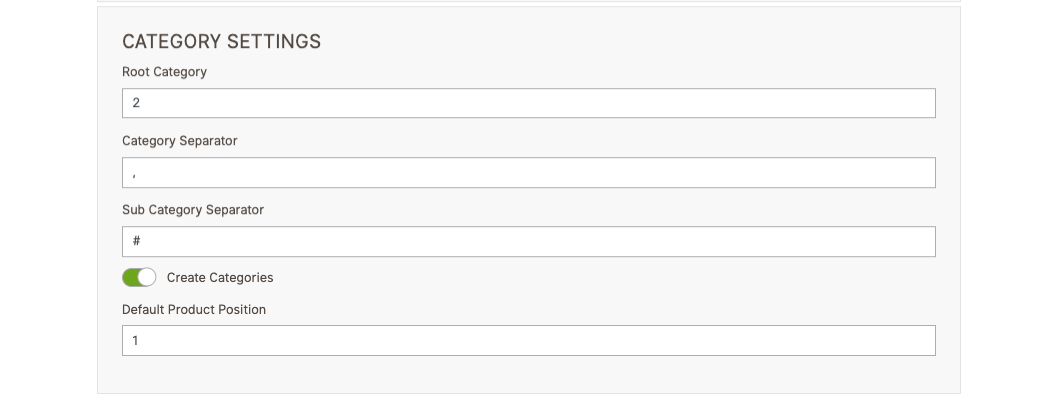
Root Category : Enter the category ID for the root category selected in the Category Defaults section. This ID must exist in the Magento database.
Category Separator : Use this field to define a separator for multiple categories. The default separator is a comma (,).
Sub Category Separator : You can define a separator for subcategories. The default value is a hash (#).
Create Categories : This toggle must be enabled if you want to create new categories during the import process.
Default Product Position : You can define the default product position within categories. The default value is set to 1.
When importing categories, you have the option to create them if they do not already exist in the system. You can specify both the Category Separator and the Subcategory Separator.
Import Category
Column Name:
categoriesColumn Value:
Main Category#Subcategory1,Main Category#Subcategory2
Import Category with Product Position
If you want to import categories along with their position values, use the following syntax.
Column Name:
categoriesColumn Value:
Main Category#Subcategory1:100,Main Category#Subcategory2:20
Assign Existing Categories to Products
To assign existing categories to a product, use the
category_idscolumn.Column Name:
category_idsColumn Value:
10,110,20In this case, you need to specify the existing category IDs, separated by commas.
Note: When adding categories with subcategories, they must follow the same hierarchy as in Magento Admin. The first name must be the root category, followed by your new or existing categories.
ADDITIONAL
RUN, SAVE, AND DELETE


Once you have completed all configurations, the mapping and import profile is ready to begin the import process. Here are the actions you can take:
Submit: After making any changes, be sure to click the Submit button to save your configurations.
Delete: There is a delete button available on the import profile. Clicking this will permanently delete the profile, so please exercise caution when performing this action.
Run: To start the import, click the Run button. This will initiate the import process based on the configurations you have set.
Ensure all settings are accurate before running the import to avoid any issues.
IMPORT RELATED PRODUCTS
To import related products, add the following values to your CSV:
Column Name:
relatedColumn Value:
product-sku1,product-sku3,product-sku5The values should be comma-separated, and the SKUs must already exist in your Magento system.
To import related products with their position numbers, use the format below:
Column Name:
relatedColumn Value:
product-sku1:1,product-sku3:2,product-sku5:3In this example, the numbers
1, 2, 3represent the position of each related product.
IMPORT UP-SELL PRODUCTS
To import Up-sell products, add the following values to your CSV:
Column Name:
up_sellColumn Value:
product-sku1,product-sku3,product-sku5The values should be comma-separated, and the SKUs must already exist in your Magento system.
To import Up-sell products with their position numbers, use the format below:
Column Name:
up_sellColumn Value:
product-sku1:1,product-sku3:2,product-sku5:3In this example, the numbers
1, 2, 3represent the position of each Up-sell product.
IMPORT CROSS-SELL PRODUCTS
To import Cross-sell products, add the following values to your CSV:
Column Name:
cross_sellColumn Value:
product-sku1,product-sku3,product-sku5The values should be comma-separated, and the SKUs must already exist in your Magento system.
To import Cross-sell products with their position numbers, use the format below:
Column Name:
cross_sellColumn Value:
product-sku1:1,product-sku3:2,product-sku5:3In this example, the numbers
1, 2, 3represent the position of each Cross-sell product.
IMPORT ATTRIBUTE VALUES BASED ON ATTRIBUTE TYPE
Text Field, Text Area, Text Editor, Page Builder, Date, Date and Time
For these types, you can directly add your value to the respective attribute in the CSV file.
Column Name:
attribute_codeColumn Value: Directly add your text here.
Yes/No
For Yes/No attributes, you should only use this values:
YesorNo.Column Name:
attribute_codeColumn Value:
YesorNo
Multiple Select, Dropdown, Visual Swatch, Text Swatch
For these types, use the custom values that are already defined in the attribute settings of your Magento system.
Column Name:
attribute_codeColumn Value:
Custom Option ValueIf the value doesn’t exist in the current attribute set, it will create the new attribute value and assign it to the product.
Note: Make sure you use proper custom values. These are case-sensitive, so ensure correct spelling.
Price
For price attributes, only use decimal or float values.
Column Name:
attribute_codeColumn Value:
decimalorfloatvalue
Magento supports different types of attributes, and each type requires specific values when importing. Before adding attributes to your CSV, identify the attribute type in Magento’s admin attribute settings.
DELETE/REMOVE ATTRIBUTE VALUE FROM PRODUCT
If you’ve imported or updated an incorrect value in a product and need to delete or remove it, you can use the keyword
mhsi-delete(orMHSI-DELETEin uppercase) as the attribute value.This will remove the attribute value from the product during the import process.
Column Name:
attribute_codeColumn Value:
mhsi-deleteorMHSI-DELETE
Note: This action only deletes the value from the product, not from the attribute set.
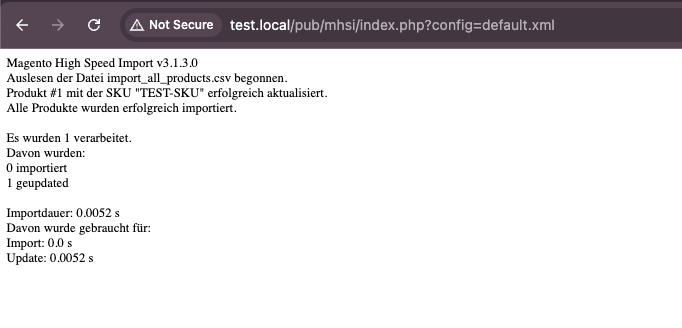
ACCESS VIA CURL COMMAND
You can use the
curlcommand to initiate an import directly from the command line.When you start an import, you’ll receive a URL that you can use in your command line.
For example, if we run our default import, the URL might look like this:
http://test.local/pub/mhsi/index.php?config=default.xml
To execute the import using
curl, you would run:curl http://youronlineshopurl.com/mhsi/index.php?config=default.xml
If your URL is protected with
.htaccess, use the following command, replacing"login"and"password"with your credentials:curl -u "login:password" http://youronlineshopurl.com/mhsi/index.php?config=default.xml
MAGENTO IMPORT DEFAULT ATTRIBUTES
This section outlines some of the key default attributes in Magento. We’ll explain their purposes and requirements, which are essential for effectively managing your products during imports. Understanding these attributes will help you ensure that your products are accurately represented in your Magento store.
Magento Attribute |
Description |
Mandatory for Imports |
Mandatory for Updates |
|---|---|---|---|
websites |
Code or ID of the website. |
||
store |
Code or ID of the StoreView within the website. |
||
attribute_set |
Attribute set name. |
||
type_id |
Product type (currently only simple and configurable). |
||
sku |
Item number. |
Yes |
Yes |
categories |
Category names (comma-separated, nesting possible) or IDs of categories from Magento. |
||
name |
Product name. |
Yes |
|
price |
Sale price. |
Yes |
|
weight |
Weight of the product. |
||
status |
Indicates whether the product is enabled or disabled (default is “active”). |
||
tax_class |
Default value can be set in the import profile (e.g., “Taxable goods VAT 19%”). |
||
description |
Long description (can be overridden in the import profile). |
||
short_description |
Short description (can be overridden in the import profile). |
||
special_price |
Special price. |
||
special_price_from |
Start date for the special price (empty = immediately). |
||
special_price_to |
End date for the special price (empty = forever). |
||
visibility |
Store visibility (options: “Catalog”, “Catalog, Search”, “Not visible individually”, “Search”). |
||
image |
All images of the product; the first image is used as the main image in product details. |
||
small_image |
Image used in the category. |
||
thumbnail |
Image used in the shopping cart. |
||
image_label |
Label for the main image. |
||
small_image_label |
Label for the small image. |
||
thumbnail_label |
Label for the thumbnail image. |
||
meta_keyword |
Keywords describing the product. |
||
meta_title |
Product title for search engines. |
||
meta_description |
Product description for search engines. |
||
manage_stock |
Indicates if stock management is enabled. |
||
qty |
Amount in stock. |
||
min_qty |
Minimum quantity considered “out of stock.” |
||
min_sale_qty |
Minimum order quantity. |
||
max_sale_qty |
Maximum order quantity. |
||
is_qty_decimal |
Indicates if the stock quantity may be a decimal number. |
||
backorders |
Indicates if backorders are allowed. |
||
qty_increments |
Packaging unit. |
||
is_in_stock |
Indicates whether the product is in stock or sold out. |
||
color |
Color of the product. |
||
product_options |
Refers to the attributes used to configure the product. |
||
country_of_manufacture |
Country of manufacture. |
||
delivery_time |
Delivery time. |
||
manufacturer |
Manufacturer name. |
||
url_key |
URL for the product detail page (usually auto-generated but can be overwritten for SEO). |
||
related |
Accessory items (comma-separated, optional order after colon; e.g., |
||
up_sell |
Up-selling articles (comma-separated, optional order after colon; e.g., |
||
cross_sell |
Cross-selling articles (comma-separated, optional order after colon; e.g., |
Warranty
This script is provided without any warranty. Please use it at your own risk and ensure you take backups and test the script in a staging or development environment before running it on a production system.
Donation / License
This script ist “donate ware” under GPL3.0. We would be glad, If you find the script useful, we would appreciate any donations via PayPal. If you need an invoice, please leave a comment with your donation.
PayPal Donation Button

Changelog
All notable changes to this project will be documented here.
[1.0.1]
Added
- Fixed PSR loggger issue
[1.0.0]
Added
- First release